Fuel filter draining and replacement (diesel engine)
(every 15,000 miles or 12 months)
Warning: Diesel fuel is flammable, so take extra precautions when you work on any part of the fuel system. Don’t smoke or allow open flames or bare light bulbs near the work area, and don’t work in a garage where a gas-type appliance (such as a water heater or clothes dryer) is present. Since fuel is carcinogenic, wear fuel-resistant gloves when there’s a possibility of being exposed to fuel, and, if you spill any fuel on your skin, rinse it off immediately with soap and water. Mop up any spills immediately and do not store fuel-soaked rags where they could ignite. When you perform any kind of work on the fuel system, wear safety glasses and have a Class B type fire extinguisher on hand.
Fuel filter draining
1. The diesel engine fuel filter incorporates a water separator that removes and traps water in the fuel. This water must be drained from the filter at the specified intervals or when the Water In Fuel (WIF) light is on.
2. Place a small container under the filter drain tube (diesel fuel can damage asphalt paving).
2009 models
3. With the engine off, rotate the drain valve one turn counterclockwise (see illustration 21.13). Allow the water and contaminated fuel to drain out. Repeat the procedure until clean fuel flows from the filter drain tube, then place the drain valve in the closed position.
2010 and later models
4. Turn the drain valve knob 1/4-turn counter-clockwise. Also unscrew the filter housing cover 1/2 turn. Allow the water and contaminated fuel to drain for two minutes, then close the drain valve and tighten the filter housing cover.
All engines
5. Remove the container and dispose of the fuel/water mixture properly.
6. If more than a couple of ounces had to be drained to remove any accumulated water, the fuel system may have to be primed in order for the engine to start. Refer to Chapter Fuel and exhaust systems – diesel engine for the priming procedure.
Fuel filter replacement
7. At the specified intervals, the fuel filter element (which incorporates a water separator) should be replaced with a new one.
8. Raise the vehicle and support it securely on jackstands.
9. Remove the left front wheel and the fender splash shield (see Body).
10. Drain the filter into a container and dispose of the fuel safely. Attach a hose extension to avoid spillage. Note: Loosen the filter slightly to speed draining.
2009 models
11. Disconnect the Water In Fuel (WIF) harness connector.
12. Disconnect the drain hose and extension hose from the drain valve.
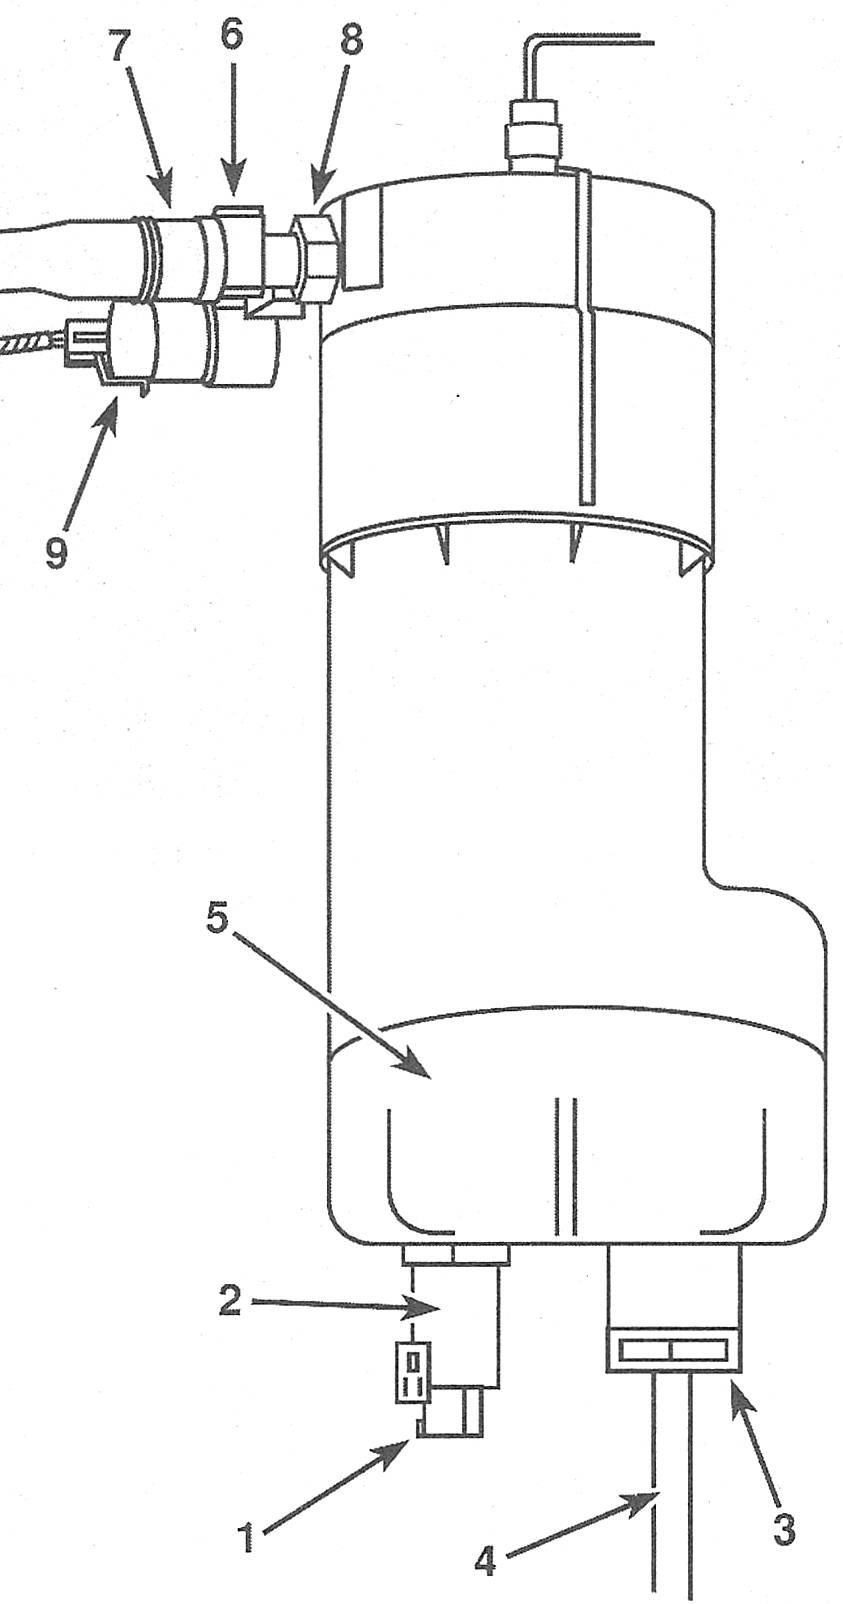
13. Use an oil filter wrench to rotate the bottom portion (canister filter) from the fuel filter assembly (see illustration).
21.13 Fuel filter assembly details (2009 6.7L diesel engine)
1 WIF harness connector
2. WIF sensor
3. Drain valve
4. Drain tube
5. Fuel filter canister
6. Fuel line connector
7. Fuel line
8. Filter screen
9. Fuel heater element connector
14. Spin the fuel filter by hand from the fuel filter/canister assembly and set it aside.
15. Remove the secondary fuel filter screen from the fuel filter assembly. Release the quick-connect fuel line fitting from the fuel filter assembly. Refer to Fuel and exhaust systems – gasoline engines Fuel and exhaust systems – diesel engine for detailed information on fuel line disconnection procedures.
16. Unscrew the line fitting from the fuel filter assembly and remove the fuel line along with the 0-ring and filter screen.
17. Clean the fuel filter screen and replace the 0-ring with a new one.
18. Installation is the reverse of removal. Use a new filter cartridge in the fuel filter assembly and a new 0-ring in the fuel line.
19. Turn the key to the On position, allowing the fuel pump to prime the system. Repeat this a few times until the engine starts. Run the engine and check for leaks.
2010 and later models
20. Clean all of the debris from the area of the fuel filter lid.
21. Use a ratchet and socket to remove the fuel filter lid, then discard the 0-ring from the canister.
22. Remove the fuel filter element.
23. Wipe out the interior of the canister but don’t use any harsh chemicals such as brake cleaner.
24. Install the new filter element. Caution: Don’t fill the canister with fuel or try to prime the system.
25. Lubricate the new 0-ring with clean engine oil and install it on the canister.
26. Replace the lid and tighten it to the torque listed in this Chapter’s Specifications.
27. Turn the key to the On position, then briefly turn it to Start. This will allow the fuel pump to run for 25 seconds and should prime the system. If the vehicle doesn’t start, repeat the procedure.