Fluid level checks
Fluid level checks (every 250 miles or weekly)
1. Fluids are an essential part of the lubrication, cooling, brake and windshield washer systems. Because the fluids gradually become depleted and/or contaminated during normal operation of the vehicle, they must be periodically replenished. See Recommended lubricants and fluids in this Chapter’s Specifications before adding fluid to any of the following components. Note: The vehicle must be on level ground when fluid levels are checked.
Engine oil
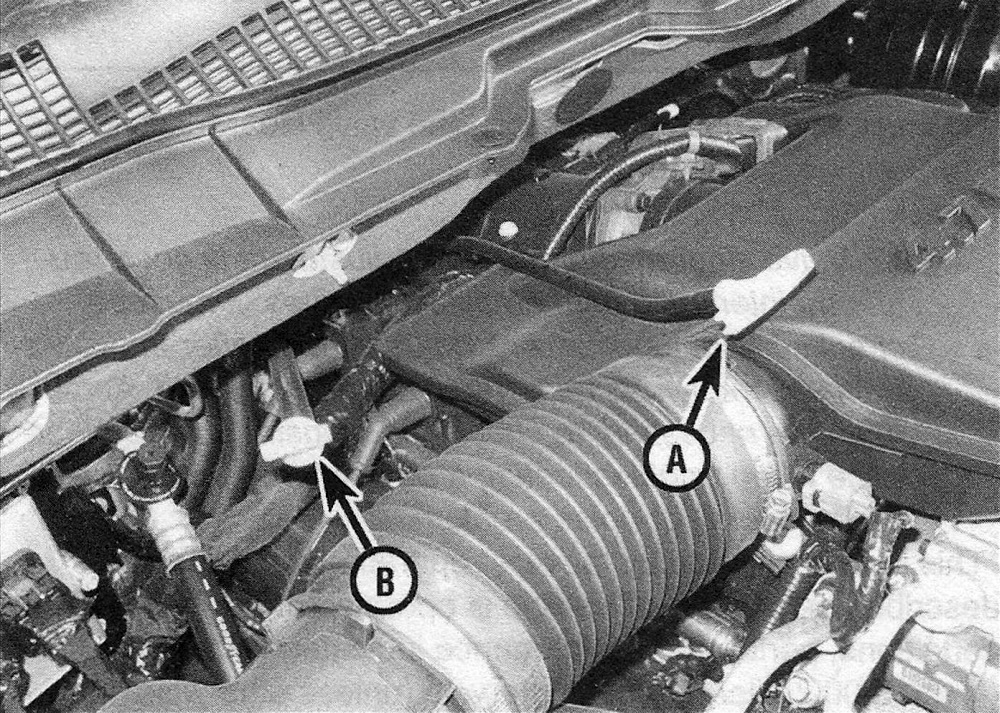
2. The oil level is checked with a dipstick, which is located on the side of the engine (see illustration). The dipstick extends through a metal tube down into the oil pan.
4.2 Engine oil dipstick (A) and automatic transmission fluid dipstick (B) locations (most models)
3. The oil level should be checked before the vehicle has been driven, or about 5 minutes after the engine has been shut off. If the oil is checked immediately after driving the vehicle, some of the oil will remain in the upper part of the engine, resulting in an inaccurate reading on the dipstick.
4. Pull the dipstick out of the tube and wipe all the oil from the end with a clean rag or paper towel. Insert the clean dipstick all the way back into the tube and pull it out again. Note the oil at the end of the dipstick. At its highest point, the level should be between the ADD and FULL marks on the dipstick (see illustration).
4.4 On gasoline models, it takes one quart of oil to raise the level from ADD mark (A) to the FULL mark (B). On diesel models, it takes two quarts
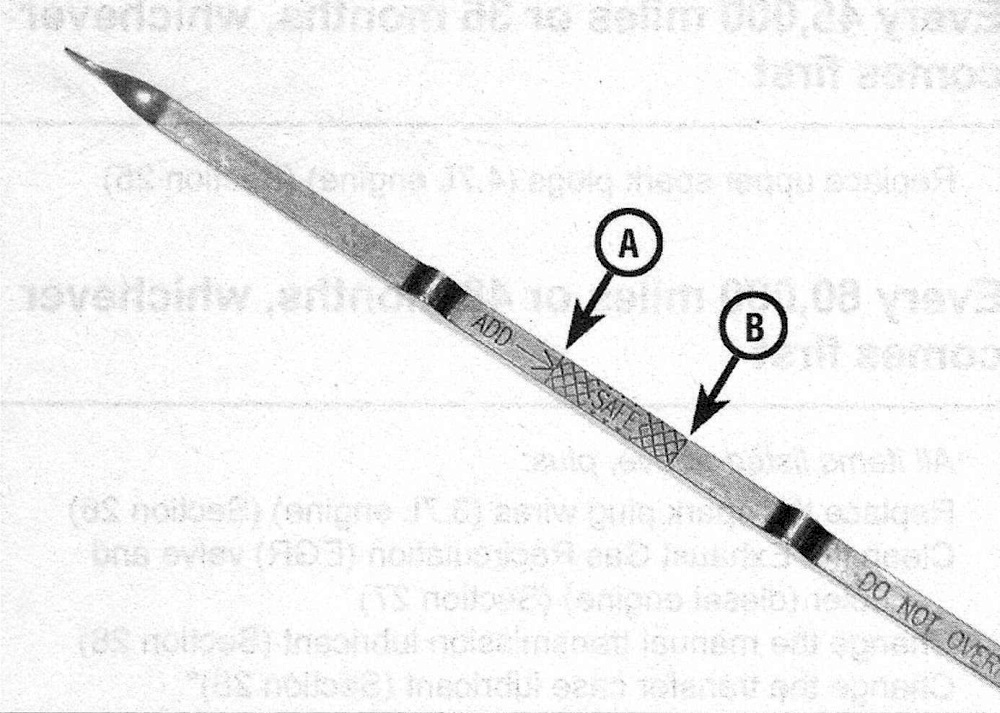
5. On gasoline engines, it takes one quart of oil to raise the level from the ADD mark to the FULL mark on the dipstick. Do not allow the level to drop below the ADD mark or oil starvation may cause engine damage. Conversely, overfilling the engine (adding oil above the FULL mark) may cause oil fouled spark plugs or oil foaming. On diesel engines,
it takes two quarts of oil to raise the level from the ADD to the FULL mark on the dipstick. Maintaining the oil level above the FULL mark can cause excessive oil consumption.
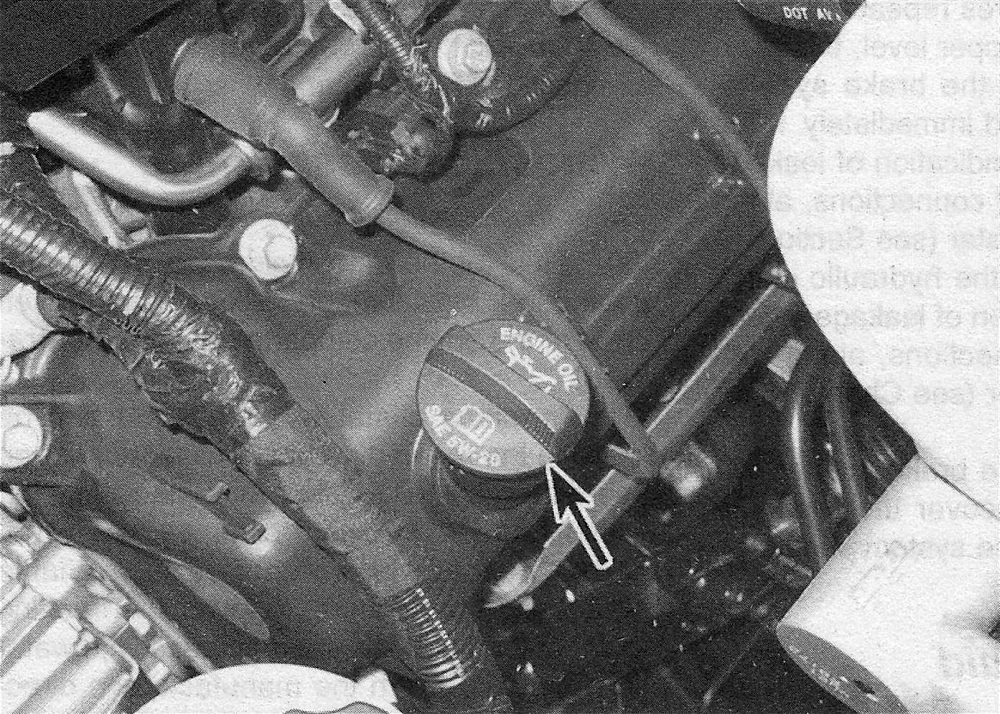
6. To add oil, remove the filler cap from the valve cover (see illustration). After adding oil, wait a few minutes to allow the level to stabilize, then pull out the dipstick and check the level again. Add more oil if required. Install the filler cap and tighten it by hand only.
4.6 Engine oil filler cap location (4.7L V8 shown, others similar)
7. Checking the oil level is an important preventive maintenance step. A consistently low oil level indicates oil leakage through damaged seals, defective gaskets or past worn rings or valve guides. If the oil looks milky in color or has water droplets in it, the cylinder head gasket (s) may be blown or the head(s) or block may be cracked. The engine should be checked immediately. The condition of the oil should also be checked. Whenever you check the oil level, slide your thumb and index finger up the dipstick before wiping off the oil. If you see small dirt or metal particles clinging to the dipstick, the oil should be changed (Engine oil and filter change). Most models are equipped with an engine oil change reminder system. This system will alert you by displaying «Oil Change Required» on the Electronic Vehicle Information Center (EVIC) when it is time to change your engine oil. Never exceed 7,500 mile oil change intervals even if the light doesn’t come on.
Engine coolant
Warning: Do not allow antifreeze to come in contact with your skin or painted surfaces of the vehicle. Flush contaminated areas immediately with plenty of water. Don’t store new coolant or leave old coolant lying around where it’s accessible to children or pets -they’re attracted by its sweet smell. Ingestion of even a small amount of coolant can be fatal! Wipe up garage floor and drip pan spills immediately. Keep antifreeze containers covered and repair cooling system leaks as soon as they’re noticed.
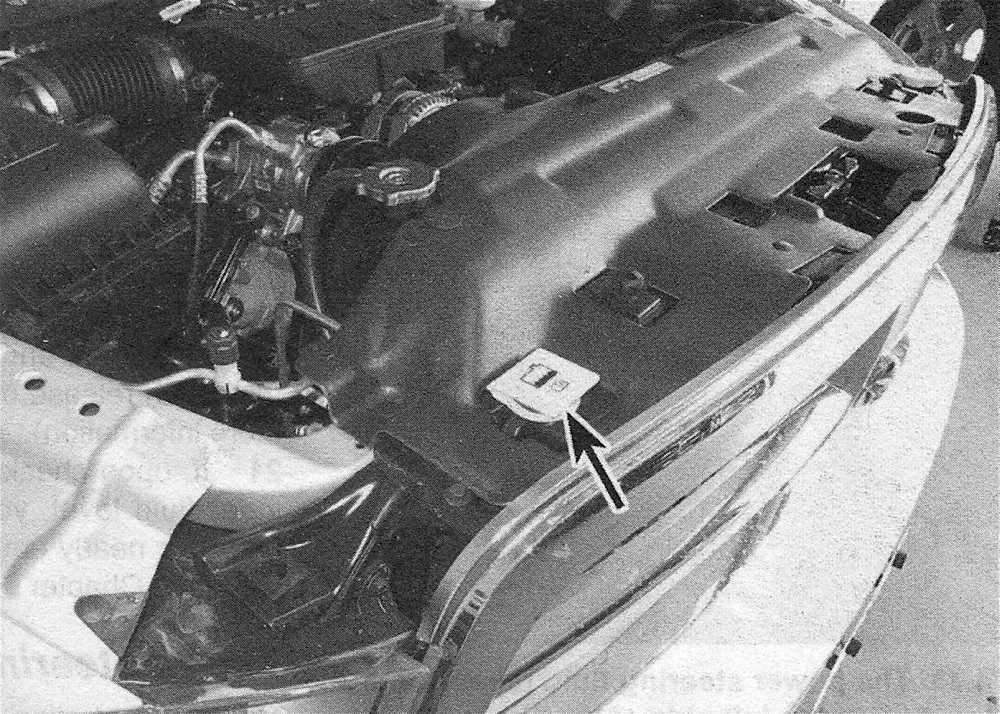
8. All vehicles covered by this manual are equipped with a pressurized coolant recovery system. A plastic coolant reservoir is located at the right-front corner of the engine compartment, just behind the grille (see illustration), mounted to the right side of the radiator fan shroud, or at the right-rear corner of the engine compartment, depending on model.
4.8 Location of the coolant reservoir/expansion tank (some gasoline-engine models)
9. The coolant level in the tank should be checked regularly. Warning: Do not remove the cap to check the coolant level when the engine is warm! The level in the tank varies with the temperature of the engine.
a) Start the engine. Once the engine has warmed up, let the engine idle and check the coolant level in the reservoir. The level should be between the marks.
b) If it isn’t, allow the engine to cool, then remove the cap from the reservoir tank and add a 50/50 mixture of ethylene glycol based antifreeze and water.
10. Drive the vehicle and recheck the coolant level. If only a small amount of coolant is required to bring the system up to the proper level, water can be used. However, repeated additions of water will dilute the antifreeze and water solution. In order to maintain the proper ratio of antifreeze and water, always top up the coolant level with the correct mixture. Don’t use rust inhibitors or additives. An empty plastic milk jug or bleach bottle makes an excellent container for mixing coolant.
11. If the coolant level drops consistently, there may be a leak in the system. Inspect the radiator, hoses, filler cap, drain plugs and water pump (0). If no leaks are noted, have the pressure cap or expansion tank cap pressure tested by a service station.
12. If you have to remove the pressure cap or expansion tank cap, wait until the engine has cooled completely, then wrap a thick cloth around the cap and turn it to the first stop. If coolant or steam escapes, or if you hear a hissing noise, let the engine cool down longer, then remove the cap.
13. Check the condition of the coolant as well. It should be relatively clear. If it’s brown or rust colored, the system should be drained, flushed and refilled. Even if the coolant appears to be normal, the corrosion inhibitors wear out, so it must be replaced at the specified intervals.
Brake and clutch fluid
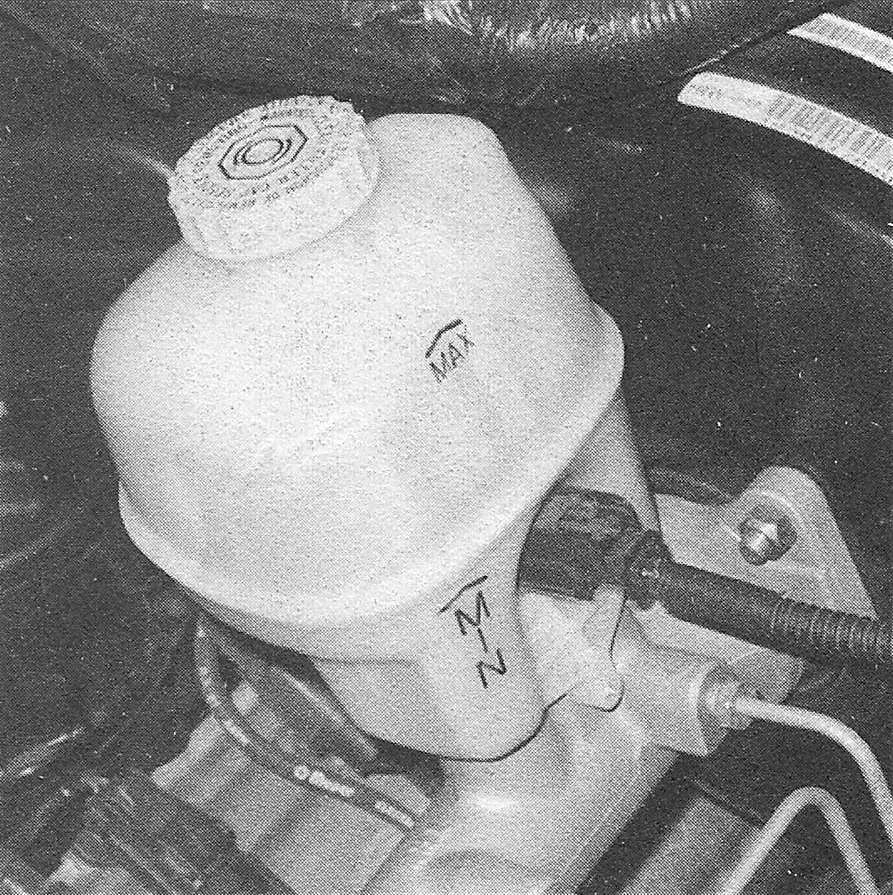
14. The brake master cylinder is located in the driver’s side of the engine compartment, near the firewall. The hydraulic clutch master cylinder used on manual transmission vehicles is sealed at the factory and requires replacement if leaks develop.
15. To check the fluid level of the brake master cylinder, simply look at the MAX and MIN marks on the reservoir (see illustration). The level should be within the specified distance from the maximum fill line.
4.15 Never let the brake fluid level drop below the MIN mark
16. If the level is low, wipe the top of the reservoir cover with a clean rag to prevent contamination of the brake system before lifting the cover.
17. Add only the specified brake fluid to the brake reservoir (refer to Recommended lubricants and fluids in this Chapter’s Specifications or your owner’s manual). Mixing different types of brake fluid can damage the system. Fill the brake master cylinder reservoir only to the MAX line. Warning: Use caution when filling the reservoir – brake fluid can harm your eyes and damage painted surfaces. Do not use brake fluid that is more than one year old or has been left open. Brake fluid absorbs moisture from the air. Excess moisture can cause a dangerous loss of braking.
18. While the reservoir cap is removed, inspect the master cylinder reservoir for contamination. If deposits, dirt particles or water droplets are present, the system should be drained and refilled.
19. After filling the reservoir to the proper level, make sure the lid is properly seated to prevent fluid leakage and/or system pressure loss.
20. The fluid in the brake master cylinder will drop slightly as the brake pads at each wheel wear down during normal operation. If the master cylinder requires repeated replenishing to keep it at the proper level, this is an indication of leakage in the brake system, which should be corrected immediately. If the brake system shows an indication of leakage check all brake lines and connections, along with the calipers and booster (Drivebelt check and replacement for more information). If the hydraulic clutch system shows an indication of leakage, check all clutch lines and connections, along with the clutch release cylinder (see Clutch and driveline for more information).
21. If, upon checking the brake master cylinder fluid level, you discover the reservoir empty or nearly empty, the system should be bled (see Brakes).
Power steering fluid
Note: On 2013 and later 1500 models with 3.6L V6 or 5.7L V8 engines, a dry-gear Electric Power Steering (EPS) system is used and there is no power steering fluid.
22. Check the power steering fluid level periodically to avoid steering system problems, such as damage to the pump. Caution: DO NOT hold the steering wheel against either stop (extreme left or right turn) for more than five seconds. If you do, the power steering pump could be damaged.
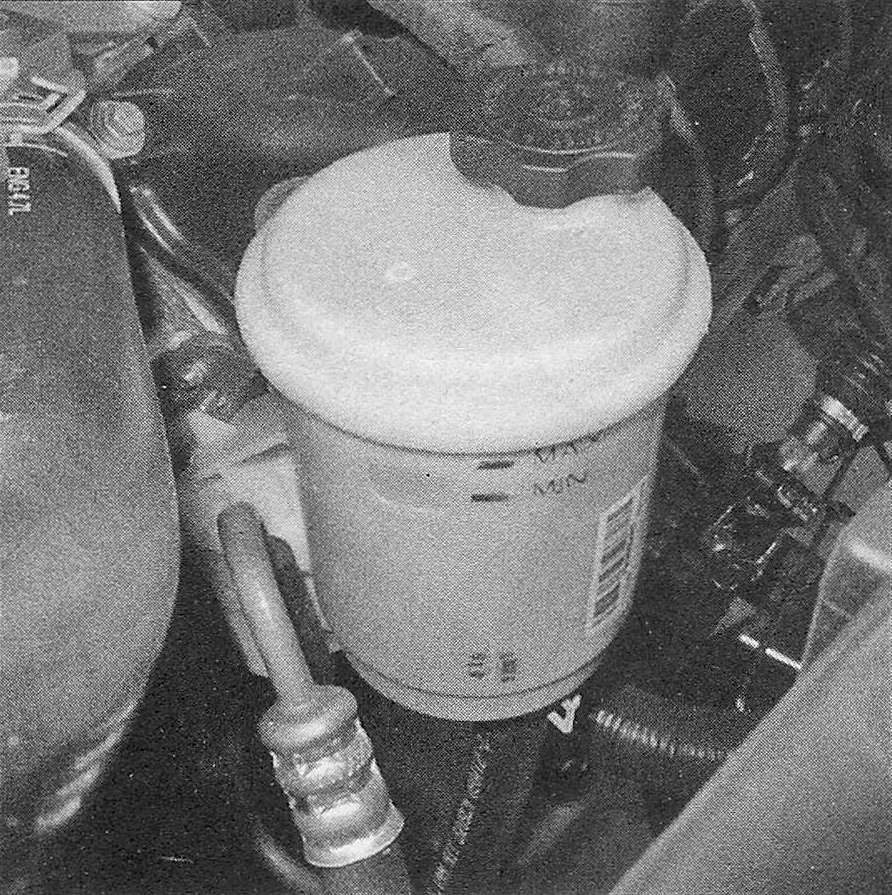
23. The power steering reservoir, located at the right side of the engine compartment (see illustration), has MIN and MAX fluid level marks on the side. The fluid level can be seen without removing the reservoir cap.
4.23 The power steering fluid reservoir is located on the left side of the engine (5.7L V8 engine shown, others similar)
24. Park the vehicle on level ground and apply the parking brake.
25. Run the engine until it has reached normal operating temperature.
26. With the engine at idle, turn the steering wheel back and forth about 10 times to get any air out of the steering system. Shut the engine off with the wheels in the straight-ahead position.
27. Note the fluid level on the side of the reservoir. It should be between the two marks.
28. Add small amounts of fluid until the level is correct. Caution: Do not overfill the reservoir. If too much fluid is added, remove the excess with a clean syringe or suction pump.
29. Check the power steering hoses and connections for leaks and wear.
Windshield washer fluid
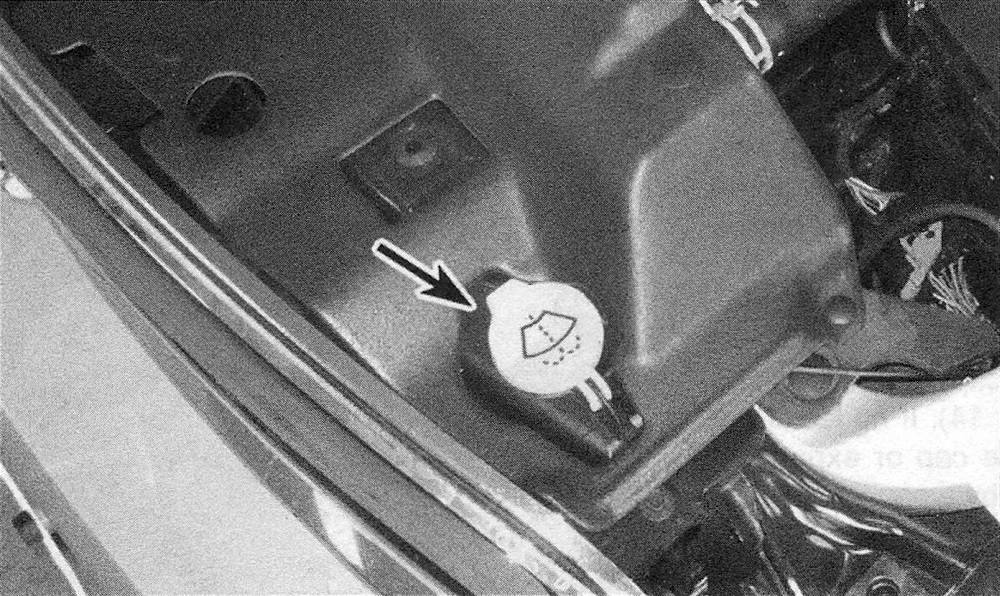
30. Fluid for the windshield washer system is stored in a plastic reservoir located at the left front of the engine compartment (see illustration).
4.30 Windshield washer fluid reservoir location (5.7L V8 shown, others similar)
31. In milder climates, plain water can be used in the reservoir, but it should be kept no more than 2/3 full to allow for expansion if the water freezes. In colder climates, use windshield washer system antifreeze, available at any auto parts store, to lower the freezing point of the fluid. Mix the antifreeze with water in accordance with the manufacturer’s directions on the container. Caution: Do not use cooling system antifreeze – it will damage the vehicle’s paint.
Automatic transmission fluid
32. The automatic transmission fluid level should be carefully maintained. Low fluid level can lead to slipping or loss of drive, while overfilling can cause foaming and loss of fluid.
33. With the parking brake set, start the engine, then move the shift lever through all the gear ranges, ending in Park. The fluid level must be checked with the vehicle level and the engine running at idle. Note: Incorrect fluid level readings will result if the vehicle has just been driven at high speeds for an extended period, in hot weather in city traffic, or if it has been pulling a trailer. If any of these conditions apply, wait until the fluid has cooled (about 30 minutes).
All models except (8HP45/845RE and 8HP70) 8-speed transmissions
34. With the transmission at normal operating temperature, remove the dipstick from the filler tube. The dipstick is located at the rear of the engine compartment on the passenger’s side (see illustration 4.2). Note: Normal operating temperature is reached after a few minutes of engine operation or after 15 miles of driving.
4.34 The automatic transmission dipstick is located at the rear of the engine compartment

35. Wipe the fluid from the dipstick with a clean rag and push it back into the filler tube until the cap seats.
36. Pull the dipstick out again and note the fluid level.
37. At normal operating temperature, the fluid level should be between the two upper reference holes (HOT) (see illus tration). On diesel models, if the fluid is warm, the level should be between the two holes. If it’s hot, the level should be in the area marked OK (crosshatched area). If additional fluid is required, add it directly into the tube using a funnel. Add the fluid a little at a time and keep checking the level until it’s correct. Note: Wait at least two minutes before rechecking the fluid level allowing the fluid to fully drain into the transmission.
4.37 Check the fluid with the transmission at normal operating temperature – the level should be in the HOT range

38. The condition of the fluid should also be checked along with the level. If the fluid at the end of the dipstick is a dark reddish-brown color, or if it smells burned, it should be changed. If you are in doubt about the condition of the fluid, purchase some new fluid and compare the two for color and smell.
(8HP45/845RE and 8HP70) 8-speed transmissions
Warning: Never get underneath the vehicle when it is supported only by a jack. The jack provided with your vehicle is designed solely for raising the vehicle to remove and install a wheel. Always use jackstands to support the vehicle when it becomes necessary to place your body underneath the vehicle.
Warning: These transmissions do not have a dipstick to check fluid level. The fluid level is checked at a filler plug on the right rear of the transmission housing. To accurately check the fluid level on this transmission, the fluid temperature must be below 86-degrees F, the engine must be running in Park and the vehicle has to be raised off the ground. There is a risk of personal injury from hot transmission fluid and also from the nearby exhaust system. Therefore if attempting this procedure, wear heat-proof gloves and position yourself beneath the vehicle so you are not at risk of being splashed by any transmission fluid. Do not remove the fill plug unless the engine is running at idle and in Park, because the transmission fluid drains from the torque converter once the engine is switched off and flows back to the transmission pan. If removed with the engine Off, a large amount of transmission fluid will be expelled from the plug hole.
Note: The vehicle must be level to accurately check the automatic transmission fluid, so it will be necessary to raise both the front and rear of the vehicle.
38. With the parking brake set, start the engine, then move the shift lever through all the gear ranges, ending in Park. The fluid level must be checked with the vehicle level and the engine running at idle. It is critical that the automatic transmission fluid temperature be below 86-degrees F to obtain an accurate fluid level reading.
39. Raise the vehicle and support it securely on jackstands.
Note: On models with adequate clearance, this won’t be necessary.
40. Disable the traction control (ESC) by turning the system off at the instrument panel.
41. Make sure the engine is idling in «Park», then place a drain pan underneath the fill plug to catch any fluid that may come from the plug and remove the plug from the right rear side of the transmission.
Warning: Position your body far enough away from the filler plug hole as hot transmission fluid can cause burns. Also take care as the exhaust is positioned close to the filler plug.
42. Add fluid to the fill plug hole, slightly overfilling the transmission and allowing the excess to drain until fluid only drips out of the oil fill plug hole, then install the plug and tighten it securely.
43. Apply the brake, then place the transmission in Reverse and hold it there for five seconds, then into Drive for five seconds.
44. Release the brakes and slowly accelerate until the transmission shifts into second gear and hold it there for five seconds.
45. Slowly apply the brake and place the transmission in to neutral, hold the brake and raise the engine RPM to 2,000 rpm and hold five seconds.
46. Release the accelerator and allow the transmission to return to idle, then place the transmission in park.
47. Remove the fill plug and allow any excess fluid to drain until the fluid only drips out.
48. Install the fill plug and tighten it to the torque listed in this Chapter’s Specifications.