Oil pan – removal and installation
Warning: Wait until the engine is completely cool before beginning this procedure.
Removal
1. Disconnect the cable from the negative terminal of the battery (see Engine electrical systems).
2. Raise the vehicle and support it securely on jackstands (see Tune-up and routine maintenance).
3. Drain the engine oil and replace the oil filter (see Tune-up and routine maintenance).
4. Remove the dust cover/transmission brace.
5. Remove the fan and the fan shroud (see Cooling, heating and air conditioning systems).
6. Detach the automatic transmission
cooler lines from the radiator and the clips, then move them out of the way.
7. Remove the crossmember beneath the oil pan (see illustration).
12.7 Remove the front crossmember mounting bolts and take the crossmember from the chassis

4WD models
8. Unbolt the steering gear and lower it down without disconnecting the fluid lines (see Suspension and steering systems).
9. Mark the front driveshaft position, then detach it from the front axle (see Clutch and driveline).
10. Use jacks to securely support the front axle at each end.
11. Remove the axle mounting bolts, then slowly and carefully lower the front axle until there’s sufficient working room for oil pan removal.
All models
12. Support the engine from above with an engine hoist or an engine support fixture (see 3.6L V6 engine), take a little weight off the engine with the hoist or fixture, and remove the through-bolts from the engine mounts (Engine mounts – check and replacement). Now raise the engine farther.
13. Remove the transmission mount and raise the transmission for additional clearance if needed.
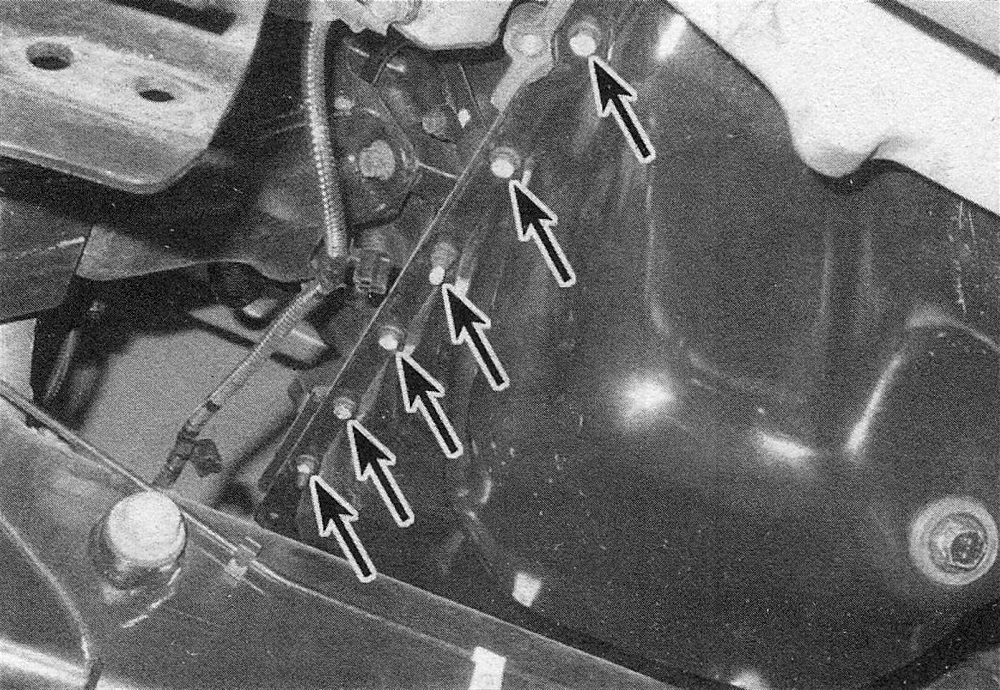
14. Remove the oil pan bolts (see illustration), then lower the pan from the engine. The pan will probably stick to the engine, so strike the pan with a rubber mallet until it breaks the gasket seal.
Caution: Before using force on the oil pan, be sure all the bolts have been removed. Don’t pry on the gasket – it’s part of the windage tray.
12.14 Remove the oil pan mounting bolts from the perimeter of the oil pan – left side shown
15. When you have enough room, unbolt and remove the oil pump pick-up tube.
16. Remove the windage tray and gasket assembly. Discard it.
Installation
17. Wash out the oil pan with solvent.
18. Thoroughly clean the mounting surfaces of the oil pan and engine block. Wipe the gasket surfaces clean with a rag soaked in brake cleaner.
19. Install the oil pump pick-up tube with new 0-rings.
20. Apply a bead of RTV sealant to the four joints where the timing chain cover meets the block and where the rear main oil seal retainer meets the block. Replace the windage tray/ gasket assembly with a new one.
21. Make sure the alignment studs are installed in the correct locations in the engine block.
22. Lift the pan into position, slipping it over the alignment studs and being careful not to disturb the windage tray/gasket, install several bolts finger tight. When all the bolts are in place, install the oil pan nuts onto the studs.
23. Tighten the fasteners to the torque listed in this Chapter’s Specifications starting with the center bolts and working outward, from side-to-side.
24. The remainder of installation is the reverse of removal.
25. Add the proper type and quantity of oil and a new oil filter (see Tune-up and routine maintenance), start the engine and check for leaks before placing the vehicle back in service.