Fuel lines and fittings – repair and replacement
Warning: Gasoline is extremely flammable, so take extra precautions when you work on any part of the fuel system.
1. Always relieve the fuel pressure before servicing fuel lines or fittings on fuel-injected vehicles (Fuel pressure relief procedure).
2. The fuel supply and return lines connect the fuel tank to the fuel rail on the engine. Inspect the fuel and the evaporative emission control (EVAP) system lines for leaks, kinks and dents whenever you’re servicing something underneath the vehicle. All of these lines are secured to the vehicle underbody by plastic clips. To disengage fuel and/or vapor line(s) from the simpler style clip, simply pry the retainers apart and pull out the line(s). To disengage the lines from a clamshell style clip, pry open the clamshell door (the outer half of the clip) with a small screwdriver and swing the door open.
3. Whenever you’re working under the vehicle, Inspect all fuel and EVAP lines for leaks, kinks, dents and other damage. Always replace a damaged fuel line or EVAP line immediately. Leaking fuel and EVAP lines will result in loss of fuel and excessive air pollution (leaking raw fuel emits unburned hydrocarbon vapors into the atmosphere).
4. If you find signs of dirt in the lines during disassembly, disconnect all lines and blow them out with compressed air. Inspect the fuel strainer on the fuel pump (Fuel pump and fuel level sending unit module – removal and installation) for damage and deterioration.
Steel tubing
5. Because fuel lines used on fuel-injected vehicles are under fairly high pressure, it is critical that they be replaced with lines of equivalent specification. If you have to replace a steel line, make sure that you use steel tubing that meets the manufacturer’s specifications. Don’t use copper or aluminum tubing to replace steel tubing. These materials cannot withstand normal vehicle vibration.
6. Some steel fuel lines have threaded fittings. When loosening these fittings to service or replace components:
a) Use a backup wrench on the stationary portion of the fitting while loosening and tightening the fitting nuts.
b) If you’re going to replace one of these fittings, use original equipment parts or parts that meet original equipment standards.
Plastic tubing
7. If you ever have to replace a plastic line, use only the original equipment plastic tubing. Caution: When removing or installing plastic fuel line tubing, be careful not to bend or twist it too much, which can damage it. And damaged fuel lines MUST be replaced! Also, be aware that the plastic fuel tubing is NOT heat resistant, so keep it away from excessive heat. Nor is it acid-proof, so don’t wipe it off with a shop rag that has been used to wipe off battery electrolyte. If you accidentally spill or wipe electrolyte on plastic fuel or emissions tubing, replace the tubing.
Flexible hoses
Warning: Use only original equipment replacement hoses or their equivalent. Unapproved hoses might fail when subjected to the high operating pressures of the fuel system.
8. Don’t route fuel hoses within four inches of exhaust system components or within ten inches of a catalytic converter. Make sure that no flexible hoses are installed directly against the vehicle, particularly in places where there is any vibration. If allowed to touch some vibrating part of the vehicle, a hose can easily become chafed and it might start leaking. A good rule of thumb is to maintain a minimum of 1/4-inch clearance around a hose (or metal line) to prevent contact with the vehicle underbody.
Fuel line and EVAP line quick-connect fittings
Warning: ALWAYS relieve the fuel system pressure (Fuel pressure relief procedure) before disconnecting a fuel line fitting.
9. The vehicles covered in this manual use several kinds of fuel line quick-connect fittings for connections at the fuel pump, the EVAP canister and the fuel rail.
10. The procedure for releasing each type of fuel line fitting is different. But a few rules of thumb apply to all fittings:
a) ALWAYS relieve the fuel system pressure (Fuel pressure relief procedure) before disconnecting a fuel line fitting.
b) Inspect the fitting for dirt. If the fitting is dirty, clean it off before disassembling it. The seals in the fitting will stick to the fuel line as they age. Twist the fitting on the line, then push and pull the fitting until it moves freely.
c) Always disconnect all fuel line fittings from a fuel system component before removing the component.
d) When disconnecting a quick-connect fitting, inspect the condition of the retainer before reconnecting the fitting. The best strategy with respect to retainers is to simply replace the retainer every time that you disconnect the fitting.
e) When you disconnect a fitting with an 0-ring inside, inspect the 0-ring before reconnecting the fitting. Fuel line fittings are under the same pressure as the rest of the fuel system, so to avoid leaks (and fires!) make VERY SURE that the 0-ring is good condition. Even better, simply replace it.
f) In most cases, the fitting itself is a non-removable part of the fuel line, so you might have to replace an entire fuel line if a fitting is damaged or defective.
Two -button type fitting
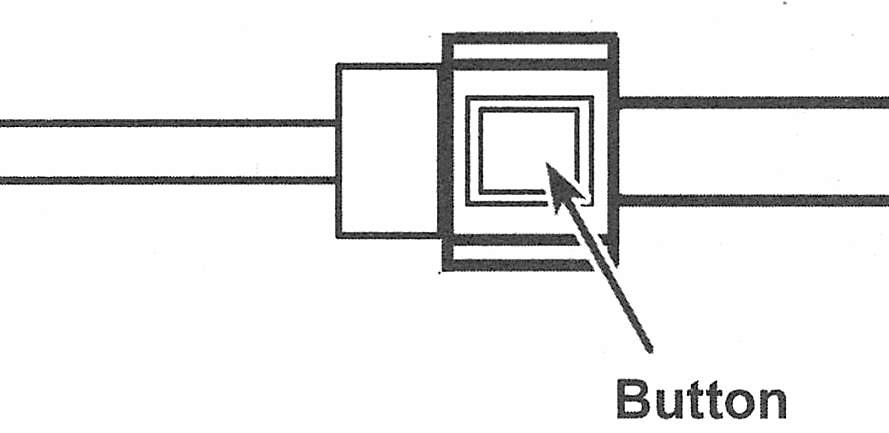
11. This type of fitting has a pair of push-buttons located on opposite sides of the fitting (see illustration). No special tools are needed to disconnect a two-button fitting. Simply press on both buttons and pull the fitting off the fuel line or fuel component to which it’s connected.
4.11 Some quick-connect fittings have two buttons (one on each side of the fitting) that must be depressed to release the fitting. No tools are necessary
12. To reconnect a two-button fitting, push the fitting onto the fuel line or fuel system component until the raised stop on the fuel line or component is fully seated against the back of the fitting, then keep pushing until you hear/feel a click. Verify that the fitting is correctly reconnected by trying to pull the fuel line or component and the fitting in opposite directions.
Pinch -type fitting
13. Instead of push-buttons, this type of fitting has two finger tabs. Again, no special tools are needed to disconnect it. Simply pinch both tabs together and pull the fitting off the fuel line or fuel component to which it’s connected.
14. To reconnect a pinch-type fitting, push it onto the fuel line or fuel component until the raised stop on the fuel line or component is fully seated against the back of the fitting. Then keep pushing until you feel a click. Verify that the fitting is correctly reconnected by trying to pull the fuel line or component and the fitting in opposite directions.
Single -tab type fitting
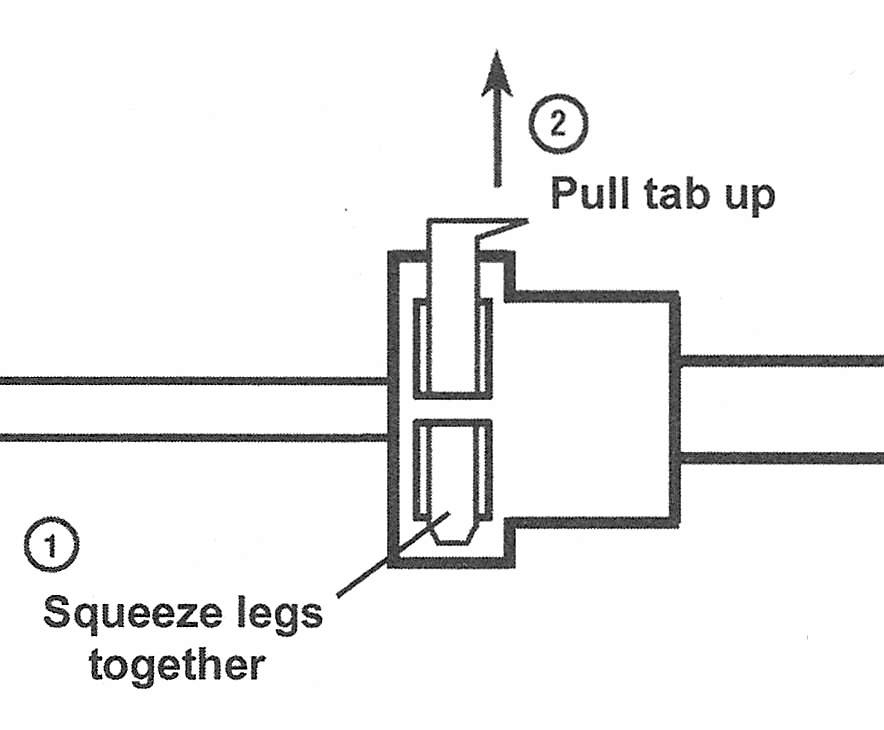
15. This type of fitting is locked into place by a single removable pull tab (see illustration). The only tool you might need to disconnect it is a small screwdriver. To disconnect the fitting, squeeze the legs of the tab together, pull up the tab (pry it up with a small screwdriver if necessary) and pull the fitting off the fuel line or fuel component to which it’s connected. Remove and discard the old pull tab, then install a new tab before reconnecting the fitting.
4.15 To disconnect a single-tab type fitting, squeeze the legs of the tab together, pull up the tab and pull the fitting and fuel line or fuel component apart. Discard the old tab and substitute a new one for reassembly
16. To reconnect a single-tab type fitting, install a new pull tab (but don’t push it down into its locked position), push the fitting onto the fuel line or fuel component until the raised stop on the fuel line or component is seated against the back of the fitting, then keep pushing until you hear/feel a click. When the fitting is fully seated, push the new tab down until it locks into place. Verify that the fitting is locked by firmly pulling the fuel line or component and the fitting in opposite directions.
Two -tab type fitting
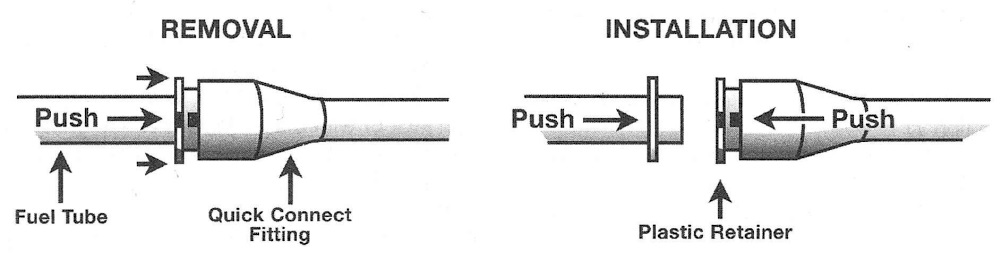
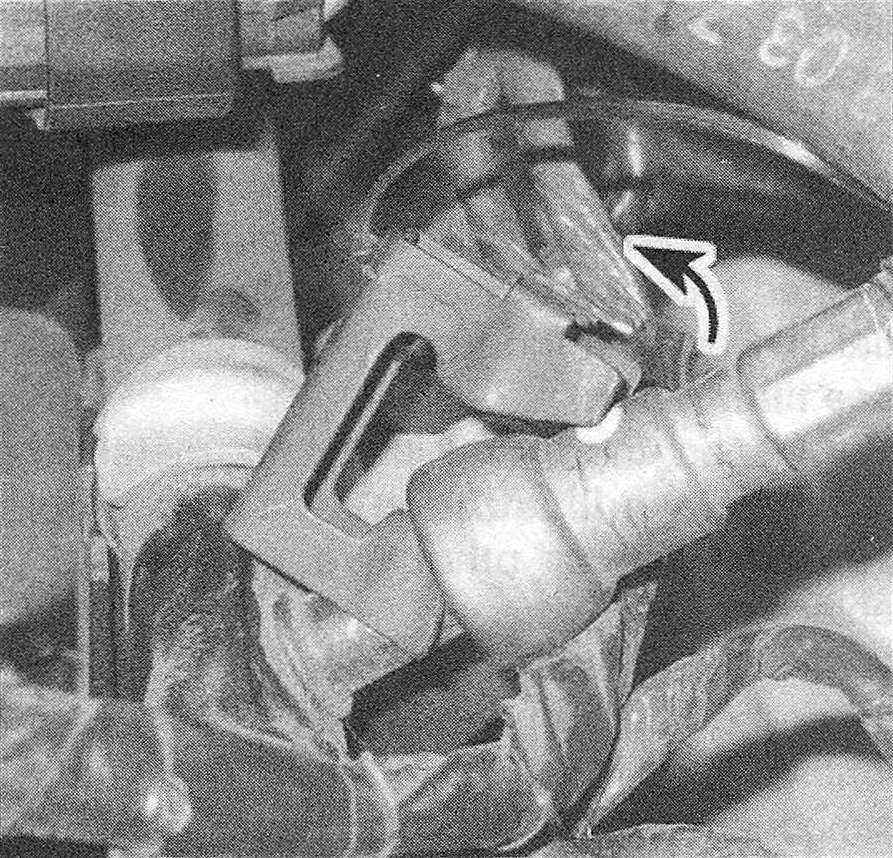
17. This type of fitting is one of the more common ones used on Dodge pick-ups. It uses a plastic retainer with two release tabs protruding from opposite sides of the fitting. To disconnect it, depress both release tabs with your fingers, then pull the fitting off the fuel line or fuel component (see illustration). Caution: Do NOT use a tool, such a pair of pliers, to squeeze the tabs together. Using anything besides your fingers might damage the plastic retainer. The retainer will remain on the fuel line or fuel component and the 0-ring (see illustration) will remain inside the fitting. Inspect the condition of the 0-ring. If it’s cracked, torn, deteriorated or otherwise damaged in any way, replace it.
4.17a To disconnect a two-tab type fitting, depress both tabs with your fingers then pull the fuel line and the fitting apart (the plastic retainer comes off with the fuel line)

4.17b Inspect the 0-ring inside the fitting. If it’s cracked, torn, deteriorated or otherwise damaged in any way, replace it
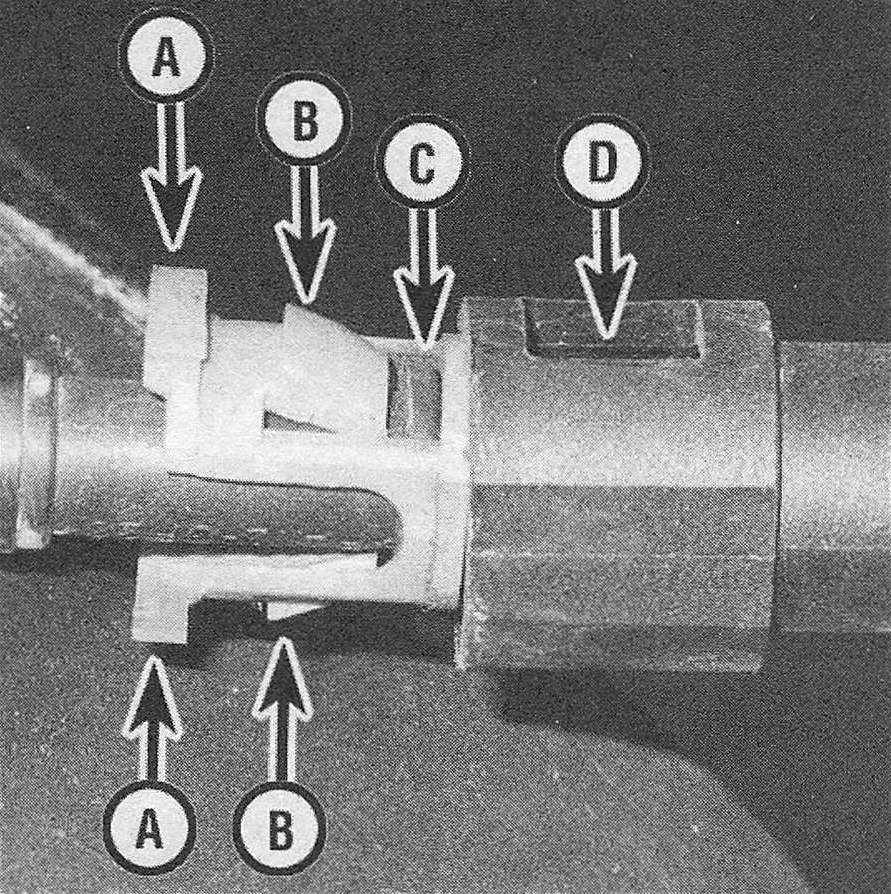
18. To reconnect a two-tab type fitting, make sure that the retainer is correctly positioned on the fuel line or component, with the locking tabs of the retainer aligned with the windows in the fitting (see illustration). When everything’s correctly aligned, push the fitting onto the fuel line or fuel component until the raised stop on the fuel line or fuel component seats against the back of the fitting, then keep pushing until you feel a click. Verify that the fitting is locked into place by firmly pulling the fuel line or component and the fitting in opposite directions.
4.18 Before reconnecting a two-tab type fitting, position the plastic retainer correctly:
A. Plastic retainer release tabs
B. Plastic retainer locking tabs (must be aligned with window in fitting)
C. Raised stop (must be visible through opening in plastic retainer)
D. Fitting window (must be aligned with locking tabs on plastic retainer)
Plastic retainer ring type fitting
19. This type of fitting has a round plastic retainer ring, usually black in color, located inside the fitting. To disconnect a plastic retainer ring type fitting, push the fitting body toward the fuel line or fuel system component to which it’s connected while firmly pushing the plastic retainer ring into the fitting, then while holding the retainer in its depressed position, pull the fuel line or fuel component out of the fitting (see illustration). Caution: When disconnecting a plastic retainer type fitting, make sure that the plastic retainer ring is pressed squarely into the fitting body. If the retainer becomes cocked in the fitting body it will be difficult or impossible to disconnect the fuel line or fuel system component from the fitting. One way to ensure that the retainer is depressed squarely into the fitting body is to depress the shoulder of the retainer with the flat face of an open-end wrench. After disconnecting the fuel line or fuel system component from the fitting, the plastic retainer ring will remain with quick-connect fitting connector body. Inspect the condition of the fitting body, the plastic retainer ring and the end of the fuel line or fuel system component for damage. Replace any damaged parts.
4.19 To disconnect a plastic retainer type fitting, push the plastic retainer ring and fitting body together and pull the line from the fitting. To reconnect, push the line into the fitting until you hear/feel a click
20. To reconnect a plastic retainer type fitting, push the fitting onto the fuel line or fuel system component until the raised stop on the fuel line or fuel component rests against the back of the fitting, then continue pushing until you feel a click. Verify that the two halves of the fitting are locked together by firmly pulling the fuel line and the fitting in opposite directions.
Metal collar type fittings with latch clips
Note: You’ll find these fittings at the connections between the fuel supply and return lines and the fuel rail.
Note: You’ll need a special tool, available at most auto parts stores, to disconnect these fittings.
21. To remove a latch clip, pull or pry the end of the latch off the fuel line, then disengage the other end of the latch from the female end of the metal collar fitting (see illustration).
4.21 To remove latch clip from a metal collar fitting, pull or pry the end of the clip off the fuel line, then disengage the other end from the female side of the fitting
22. To disconnect a metal collar fitting (with either type of latch clip), release the locking fingers inside the fitting by inserting a special fuel line disconnection tool (available at most auto parts stores) into the metal collar (see illustration). With the special tool still inserted, disconnect the metal collar from the fuel line or from the fuel system component (see illustration).
4.22a To release the locking fingers inside a metal collar type fitting, insert a special fuel line disconnection tool into the female side of the fitting until it releases the locking fingers …
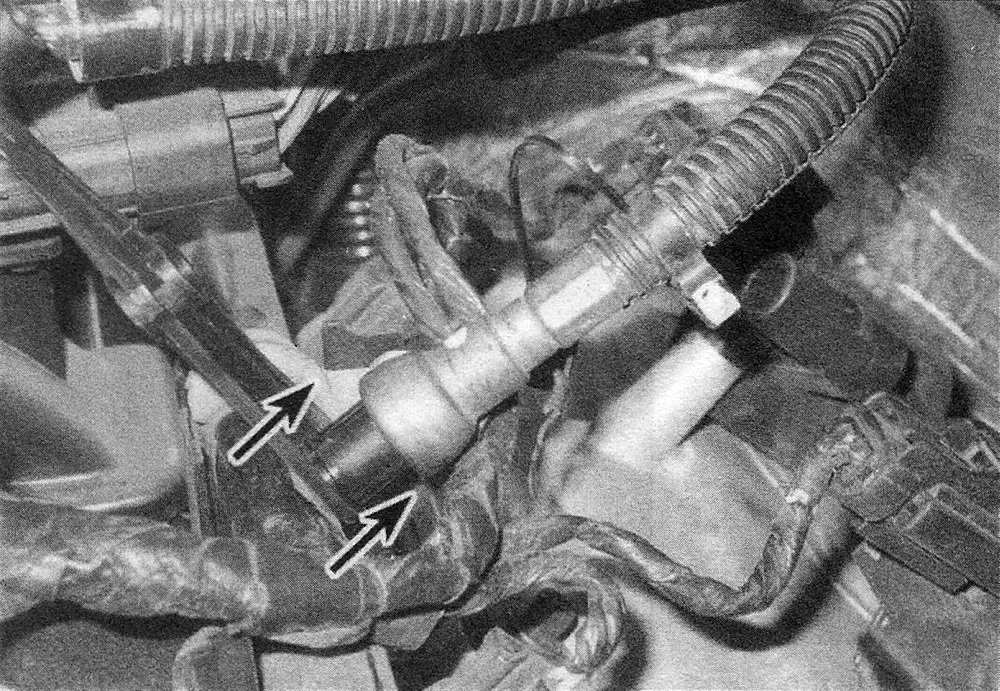
4.22b … then pull the two halves of the fitting apart

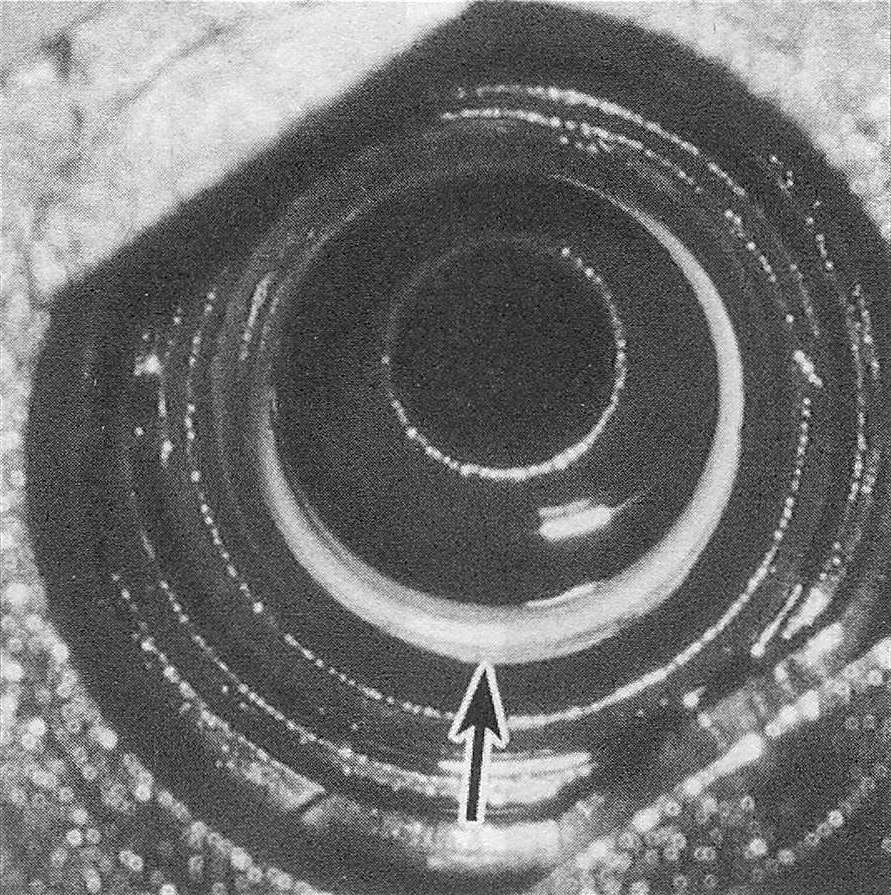
23. Inspect the 0-ring inside the metal collar fitting (see illustration). If it’s dried out, cracked, torn or otherwise deteriorated, replace it.
4.23 Inspect the old 0-ring inside the female side of the metal collar fitting. If it’s cracked, torn or otherwise deteriorated, replace it

24. Apply a few drops of clean engine oil to the end of the fuel line or fuel system component, push the fitting onto the fuel line or component until the locking fingers snap into place. Verify that the fitting is correctly connected by pulling the fuel line or component and the fitting in opposite directions.
25. Install the latch clip until it snaps into position.