Ignition system – check
Warning: Because of the high voltage generated by the ignition system, extreme care should be taken whenever an operation is performed involving ignition components. This not only includes the ignition coil, but also related components and test equipment. Warning: The following procedure requires the engine to be cranked during testing. When cranking the engine, make sure that no test leads, loose clothing, long hair, etc. comes into contact with any moving parts (drivebelt, cooling fan, etc.).
1. Before proceeding with the ignition system, check the following items:
a) Make sure the battery cable clamps, where they connect to the battery, are clean and tight.
b) Test the condition of the battery (Battery – check and replacement). If it does not pass all the tests, replace it with a new battery.
c) Check the ignition system wiring and connections for tightness, damage, corrosion or any other signs of a bad connection.
d) Check the related fuses inside the engine compartment fuse and relay box (see Chassis electrical system). If they’re burned, determine the cause and repair the circuit.
2. If the engine turns over but won’t start or has a severe misfire, perform the following steps using a calibrated ignition tester to make sure there is sufficient secondary ignition voltage to fire the spark plugs. There are several different types of calibrated ignition testers available. Either style will work on any of the engines covered in this manual.
3. Disable the fuel system by removing the fuel pump relay, which is located in the engine compartment fuse and relay box (see Chassis electrical system).
4. On 3.6L V6 and Hemi engines, you’ll have to remove each ignition coil (Ignition coil – check and replacement) to test for spark to the plug that it fires. On 3.7L V6 and 4.7L V8 engines, you’ll also have to remove each ignition coil to verify its output to the plug that it fires directly, but you can simply disconnect the spark plug wire to its companion cylinder and attach an ignition tester to the wire to verify spark to its companion cylinder.
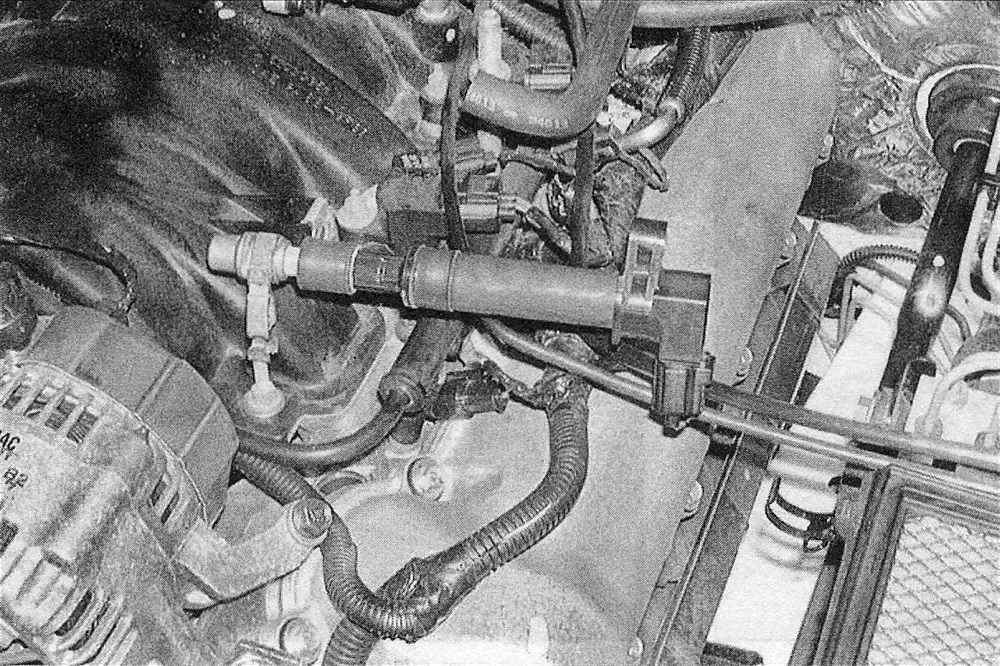
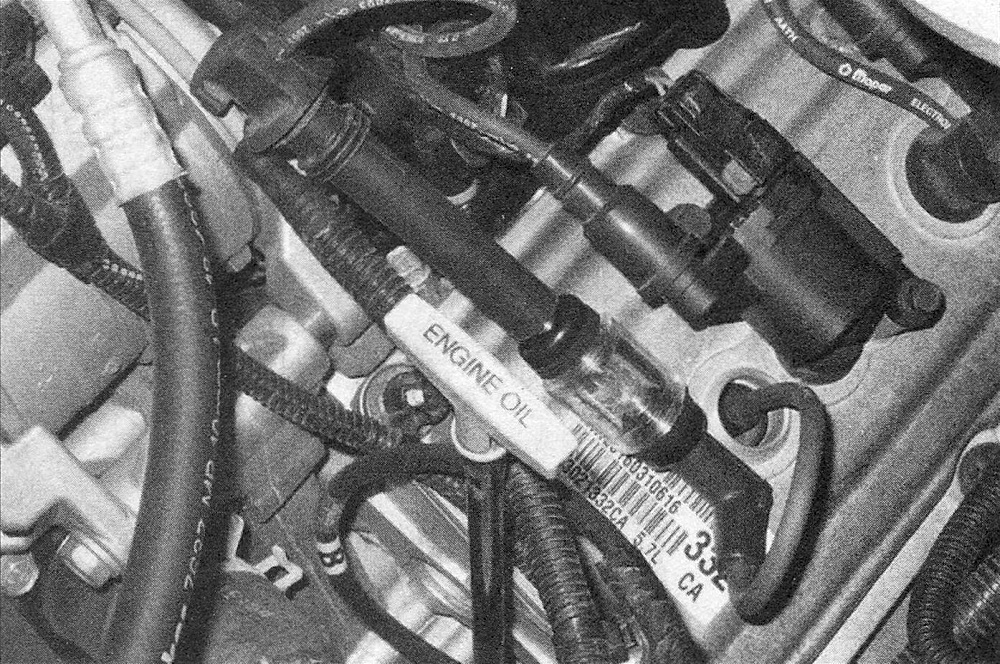
5. Attach a calibrated ignition system tester (available at most auto parts stores) to the spark plug boot (see illustrations). If you’re using a conventional style spark tester (like the one shown in the first illustration), ground the clip on the tester to a bolt or metal bracket on the engine. If you’re using a newer style tester (like the one shown in the second illustration), it’s not necessary to ground the tester because you can simply connect it to the spark plug. Crank the engine while watching the tester. Note whether a bright blue, well-defined spark occurs (conventional style tester) or if the bulb within the tester body flashes (newer style tester).
6.5a To use a calibrated ignition tester on a 5.7L Hemi V8, remove an ignition coil and connect the tester to the spark plug boot, clip the tester to a convenient ground and crank over the engine. If there’s enough power to fire the plug, bright blue sparks will be visible between the electrode tip and the tester body (weak sparks or intermittent sparks are the same as no sparks)
6.5b To use a ignition tester on a 3.7L V6 or a 4.7L V8, you need to test for spark twice at each cylinder. First, disconnect the plug wire from the lower spark plug, connect it to the tester, connect the other end of the tester to the spark plug and crank over the engine. Using this type of tester, if there’s enough power to fire the plug, the bulb inside the tester housing will flash. If the plug wire is putting out a healthy spark, remove the tester and reconnect the spark plug wire …
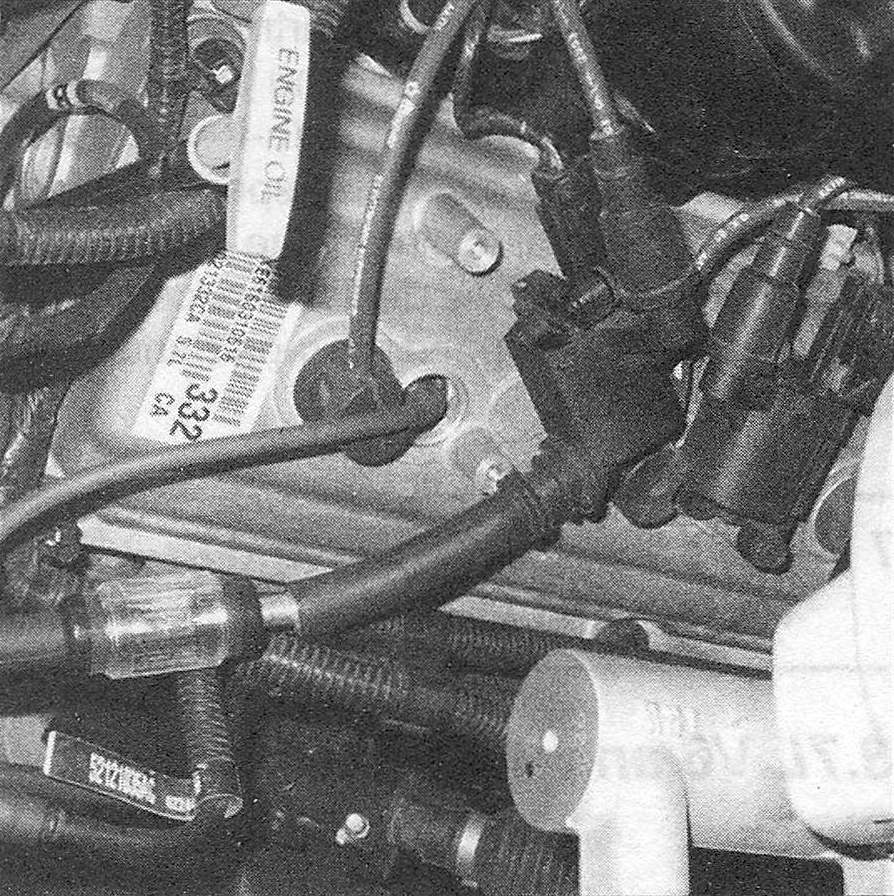
6.5c … then remove the ignition coil (Ignition coil – check and replacement), connect the tester to the spark plug boot, connect the other end of the tester to the spark plug and crank over the engine again
6. If sparks occur (or the tester body flashes) during cranking, sufficient voltage is reaching the plug to fire it. Repeat this test for each spark plug (which means both spark plugs at each cylinder on the 3.6L V6 and Hemi) to verify that all the coils are OK. However, be aware that even if all ignition coils are able to fire the spark tester, the plugs themselves might be fouled, so remove and inspect the plugs too (see Tune-up and routine maintenance).
7. If the spark plug is in good shape, the coil might be defective (Ignition coil – check and replacement).
8. If no sparks occur during cranking at one cylinder, inspect the primary wire connection at the coil from which you’re not getting any spark. Make sure that it’s clean and tight.
9. If no sparks or intermittent sparks occur during cranking at all cylinders, the PCM is probably defective. Have the PCM checked out by a dealer service department or other qualified repair shop (testing the PCM is beyond the scope of the do-it-yourselfer because it requires expensive special tools).
10. Any additional testing of the ignition system must be done by a dealer service department or by an independent repair shop with the right tools.