Ignition coil – check and replacement
3.7L V6 and 4.7L V8 engines Check
1. Remove the ignition coil (see Steps 6 through 9).
2. Clean the outer case and check it for cracks and other damage. Clean the coil primary terminals and check the coil tower terminal for corrosion. Clean it with a wire brush if any corrosion is found. Keeping all coil terminals clean and dry is essential for proper operation of the ignition system.
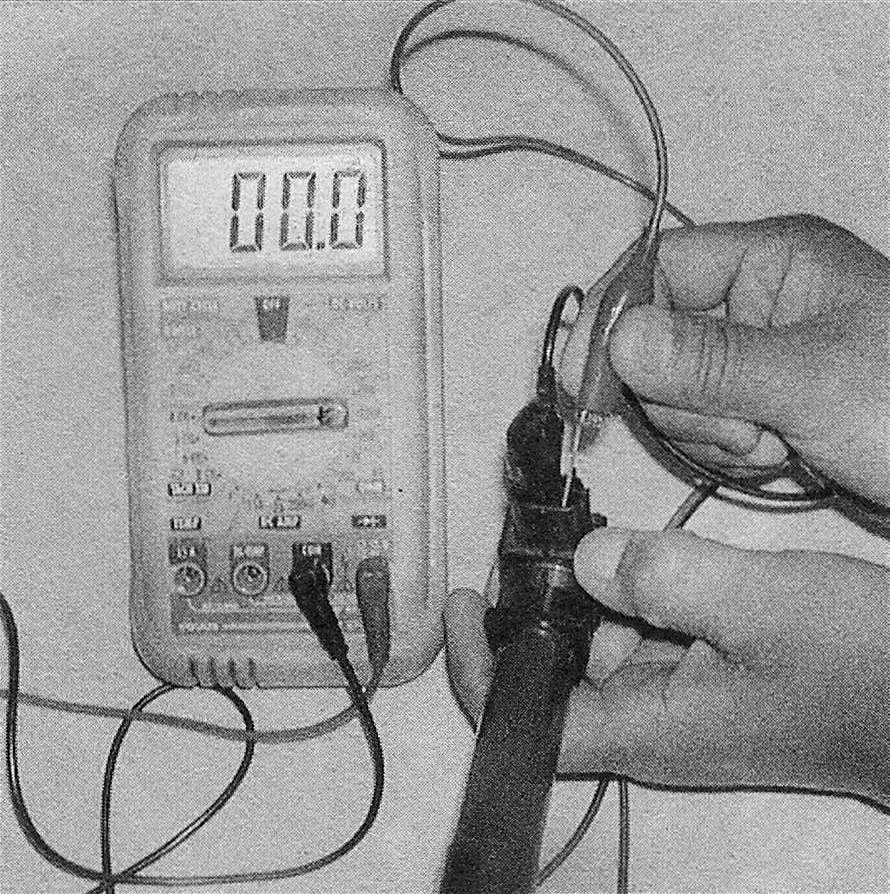
3. To check the coil primary resistance, attach the leads of an ohmmeter to the two terminals of the connector (see illustration). Compare your measurement to the primary resistance value listed in this Chapter’s Specifications. If the measured primary resistance value is not close to the specified range, replace the ignition coil.
7.3 To check the primary resistance of an ignition coil, measure the resistance across the two coil primary terminals and compare your measurement to the primary resistance listed in this Chapter’s Specifications
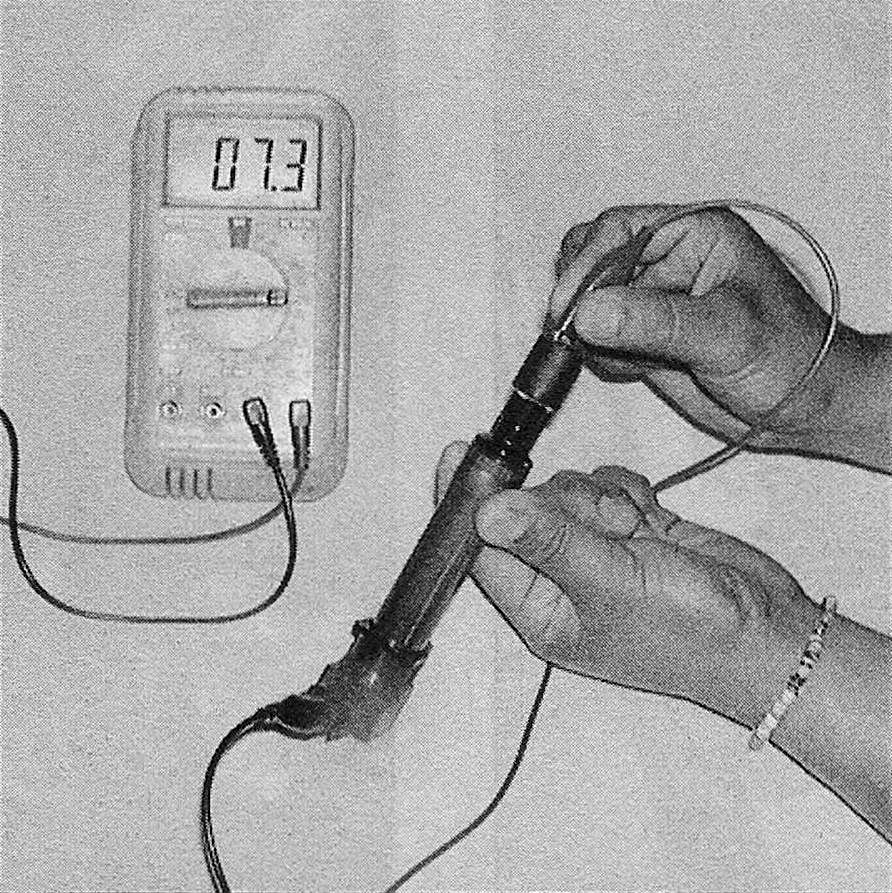
4. To check the coil secondary resistance, connect one of the ohmmeter leads to the positive terminal of the connector and the other ohmmeter lead to the high-tension terminal at the coil and then also to the terminal at the end of the spark plug wire (see illus tration). Compare your measurements to the secondary resistance value listed in this Chapter’s Specifications. If the measured secondary resistance value is not within the specified range, replace the ignition coil.
7.4 Measure the resistance between the positive terminal of the primary side and the high-tension terminal and compare your measurement to the secondary resistance listed in this Chapter’s Specifications
5. If the primary and secondary resistance values are within specification or close, but the coil seems to be misfiring or not firing at all, or is causing the PCM to set a Diagnostic Trouble Code (DTC) indicating a misfire, try swapping it with an adjacent coil. If the suspect coil was causing a DTC for one cylinder, it will likely set the same DTC when it’s installed above another cylinder. If this is the case, the coil is probably defective because it’s unlikely that the harnesses for two adjacent ignition coils would both be defective. At any rate, no further testing is possible at home. If you’re not sure whether you should replace the coil at this point, consult a dealer service department or other qualified repair shop.
Replacement
6. Depending on which coil you’re planning to check or replace, remove either the air intake duct or the air intake resonator box (see Fuel and exhaust systems – gasoline engines).
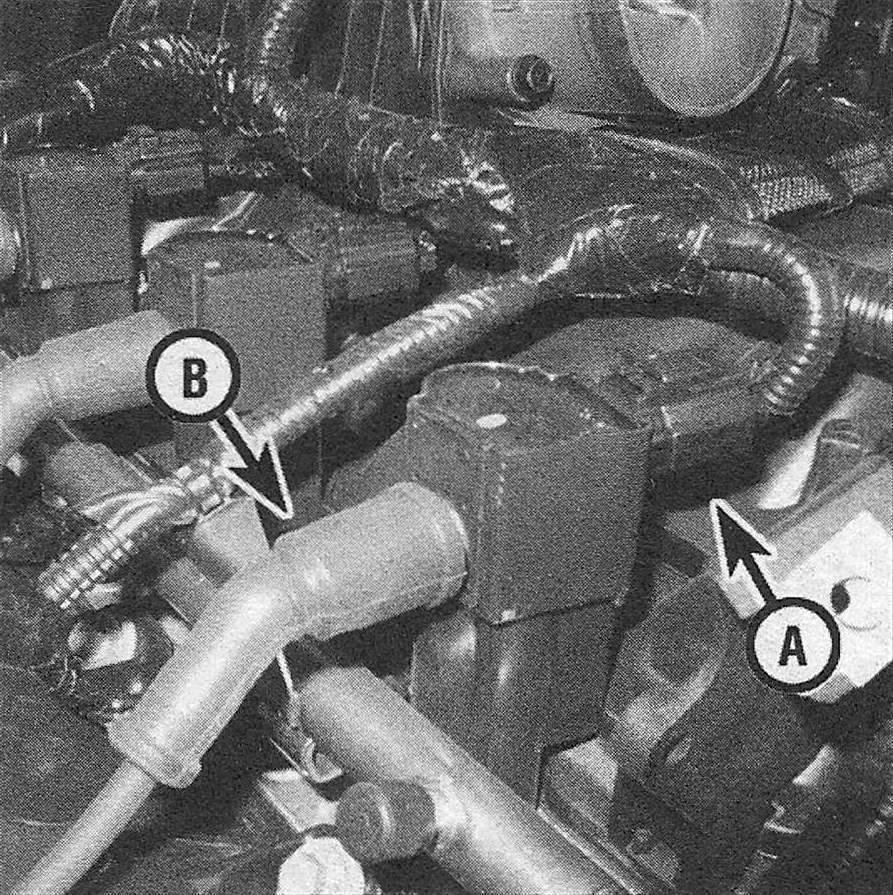
7. Disconnect the electrical connector from the coil (see Illustration). To release the connector, push down on the release lock on top of the connector and pull off the connector.
7.7 4.7L V8 ignition coil primary wiring connector (A) and the secondary wire that connects to a lower spark plug (B) – the coil itself is mounted directly on top of the upper spark plug
8. To prevent dirt and debris from falling down into the spark plug well, use compressed air to blow out the area around the base of the ignition coil.
9. Remove the ignition coil mounting nut and detach the coil from the spark plug. Detach the spark plug wire from the coil by pulling on the boot, not the wire.
10. Installation is the reverse of removal.
3.6L V6 and Hemi engines Check
11. On Hemi engines, if you’re checking one of the front coils on the left cylinder bank (cylinder numbers 1 or 3) or the front ignition coil on the right cylinder bank (cylinder number 2), it’s not really necessary to remove them to check coil primary resistance. But if you’re going to check one of the two rear coils on the left cylinder bank (cylinder numbers 5 or 7) or any of the three coils on the right cylinder bank (cylinder numbers 4, 6 or 8) besides the one for cylinder number 2, it will be easier to check these coils on the bench. To remove an ignition coil, see Steps 17 through 20.
12. On 3.6L V6 models, it isn’t necessary to completely remove the ignition coils to test them, but the upper intake manifold will have to be removed to check the left-side cylinders (2-4-6). To remove the ignition coils, see Steps 22 through 27.
13. Clean the outer case and check it for cracks and other damage. Clean the coil primary terminals and check the coil high-tension terminal for corrosion. If you find any corrosion, clean the high-tension terminal with a wire brush. Keeping the coil terminals and wires clean and dry is essential for proper operation of the ignition system.
14. To check the coil primary resistance, attach the leads of an ohmmeter to the two terminals of the connector (see illustration 7.3).
15. Compare your measurement to the primary resistance value listed in this Chapter’s Specifications. If the measured resistance value is not within the specified range, replace the ignition coil.
16. There is no published secondary resistance value available for the ignition coils used on the Hemi engine. If the primary resistance is within specification, but the coil seems to be misfiring or not firing at all, or is causing the PCM to set a Diagnostic Trouble Code (DTC) that indicates a misfire, try swapping it with an adjacent coil (and don’t forget to swap the spark plug wire for the companion cylinders of both coils too). If the suspect coil was causing a DTC for one cylinder, it will likely set the same DTC when it’s installed above another cylinder. If this is the case, the coil is probably defective because it’s unlikely that the harnesses for two adjacent ignition coils would both be defective. At any rate, no further testing is possible at home. If you’re not sure whether you should replace the coil at this point, have it checked by a dealer service department.
Replacement
Hemi engines
17. If you’re planning to check or replace the ignition coils for cylinder numbers 2, 4, 6 and/ or 8, remove the air intake duct and the resonator box (see Fuel and exhaust systems – gasoline engines).
18. Disconnect the electrical connector.
19. To prevent dirt and debris from falling into the spark plug well, blow out the area surrounding the base of the ignition coil with compressed air.
20. Remove the two coil mounting bolts. To remove the coil, carefully pull it up with a twisting motion.
21. Installation is the reverse of removal.
3.6L V6 engine
22. Remove the engine cover (see Tune-up and routine maintenance).
23. Disconnect and remove the resonator (see Fuel and exhaust systems – gasoline engines).
24. Remove the upper intake manifold (see 3.6L V6 engine).
Note: The ignition coils for cylinders 1 and 3 can be removed without having to remove the upper intake manifold.
25. Disconnect the electrical connector from the ignition coil.
26. Remove the ignition coil mounting bolt.
27. Grasp the coil firmly and pull it off the spark plug using a twisting motion.
28. Installation is the reverse of removal. Tighten the ignition coil bolts securely.