Evaporative emissions control (EVAP) system – general description and component replacement
General description
1. The Evaporative emissions control (EVAP) system prevents fuel system vapors (which contain unburned hydrocarbons) from escaping into the atmosphere. On warm days, vapors trapped inside the fuel tank expand until the pressure reaches a certain threshold, at which point the fuel vapors are routed from the fuel tank through the fuel vapor vent valve and the fuel vapor control valve to the EVAP canister, where they’re stored temporarily, until they can be consumed by the engine during normal operation. When the conditions are right (engine warmed up, vehicle up to speed, moderate or heavy load on the engine, etc.) the Powertrain Control Module (PCM) opens the canister purge solenoid, which allows the fuel vapors to be drawn from the canister into the intake manifold, where they mix with the air/fuel mixture before being consumed in the combustion chambers. This system is complex and virtually impossible to troubleshoot without the right tools and training. However, the following description should give you a good idea of how the system works and where the components are located:
2. The EVAP canister, which contain activated charcoal, is the container for storing the fuel vapors. Some models use two canisters. You’ll have to raise the vehicle to inspect or replace the canister but the canister is designed to be maintenance-free and should last the life of the vehicle. The EVAP canister is underneath the vehicle, just in front of the fuel tank.
3. The Evaporative System Integrity Monitor (ESIM) switch is mounted on one of the EVAP canisters in a vertical position. It can’t be replaced by itself; you’ll have to replace the canister assembly if it’s faulty.
4. The EVAP canister purge solenoid, which is under the control of the Powertrain Control Module (PCM), regulates the flow of vapors being purged from the EVAP canister into the intake manifold. The canister purge solenoid is normally closed. It opens only when directed to do so by the PCM, which uses the availability of intake manifold vacuum and data from various information sensor inputs to determine when and how long to open the valve. The interval of time during which the purge valve is opened by the PCM is known as its duty cycle. The canister purge solenoid valve is located in the engine compartment, where it is attached to the side of the fuse and relay box.
General system checks
5. The most common symptom of a faulty EVAP system is a strong fuel odor (particularly during hot weather). If you smell fuel while driving or (more likely) right after you park the vehicle and turn off the engine, check the fuel filler cap first. Make sure that it’s screwed onto the fuel filler neck all the way. If the odor persists, inspect all EVAP hose connections, both in the engine compartment and under the vehicle. You’ll have to raise the vehicle and place it securely on jackstands to inspect most of the EVAP system, since it’s located under the vehicle. Inspect each hose attached to the canister for damage and leakage along its entire length. Repair or replace as necessary. Inspect the canister for damage and look for fuel leaking from the bottom. If fuel is leaking or the canister is otherwise damaged, replace it.
6. Poor idle, stalling, and poor drivability can be caused by a defective fuel vapor vent valve or canister purge solenoid, a damaged canister, cracked hoses, or hoses connected to the wrong tubes. Fuel loss or fuel odor can be caused by fuel leaking from fuel lines or hoses, a cracked or damaged canister, or a defective vapor valve.
7. To check for excessive fuel vapor pressure in the fuel tank, remove the gas cap and listen for the sound of pressure release. If the fuel tank emits a whooshing sound when you open the filler cap, fuel tank vapor pressure is excessive. Inspect the canister vapor hoses and the canister inlet port for blockage or collapsed hoses. Also inspect the hose for the EVAP canister vent valve. A complete test can only be done with a proprietary OBD-II scan tool (On-Board Diagnostic (OBD) system and Diagnostic Trouble Codes (DTCs)), which will run a series of checks to detect excessive pressure. You’ll have to take the vehicle to a dealer service department to have the EVAP system professionally diagnosed.
Component replacement
EVAP canister purge solenoid
8. Disengage the EVAP canister purge solenoid from its mounting bracket by pulling it upward carefully.
9. Disconnect the electrical connector from the EVAP canister purge solenoid (see illus tration).
14.9 Disconnect the EVAP canister purge solenoid electrical connector (A), disconnect the vacuum hoses (B) and disengage the solenoid from its mounting bracket (C)
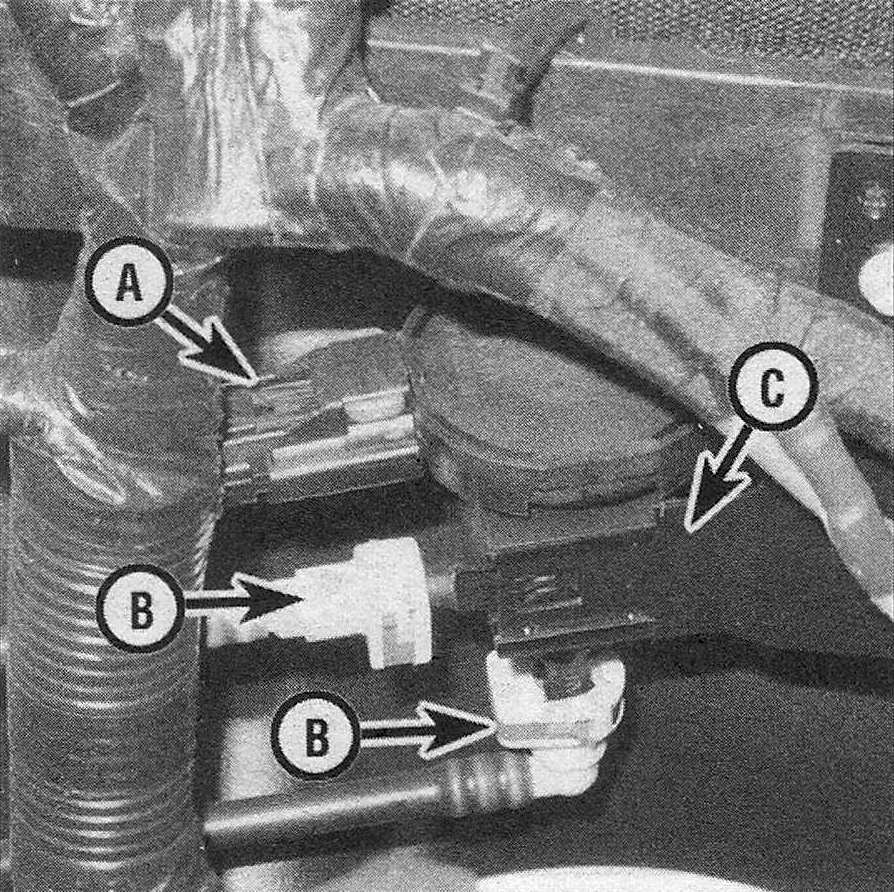
10. Detach the quick-connect fittings and remove the vapor hoses from the solenoid.
11. Installation is the reverse of removal.
EVAP canisters
12. Raise the vehicle and place it securely on jackstands.
13. Disconnect the vapor hoses from the EVAP canisters.
14. Disconnect the wiring from the ESIM switch (if so equipped).
15. Remove the lower support bracket bolts and remove the lower support bracket.
16. Remove the EVAP canister mounting nuts from the top of the upper support bracket and remove the EVAP canisters.
17. Installation is the reverse of removal.