Transmission oil cooler – removal and installation
Air-to-oil cooler
Note: All vehicles with an automatic transmission are equipped with an external air-tooil cooler as standard equipment. All coolers are mounted in front of the radiator in similar fashions, although they vary in size and in the location and number of mounting bolts.
1. Disconnect the cable (s) from the negative battery terminal(s).
2. Put a drain pan underneath the oil cooler line fittings to catch any spilled transmission fluid.
3. Raise the front of the vehicle and place it securely on jackstands.
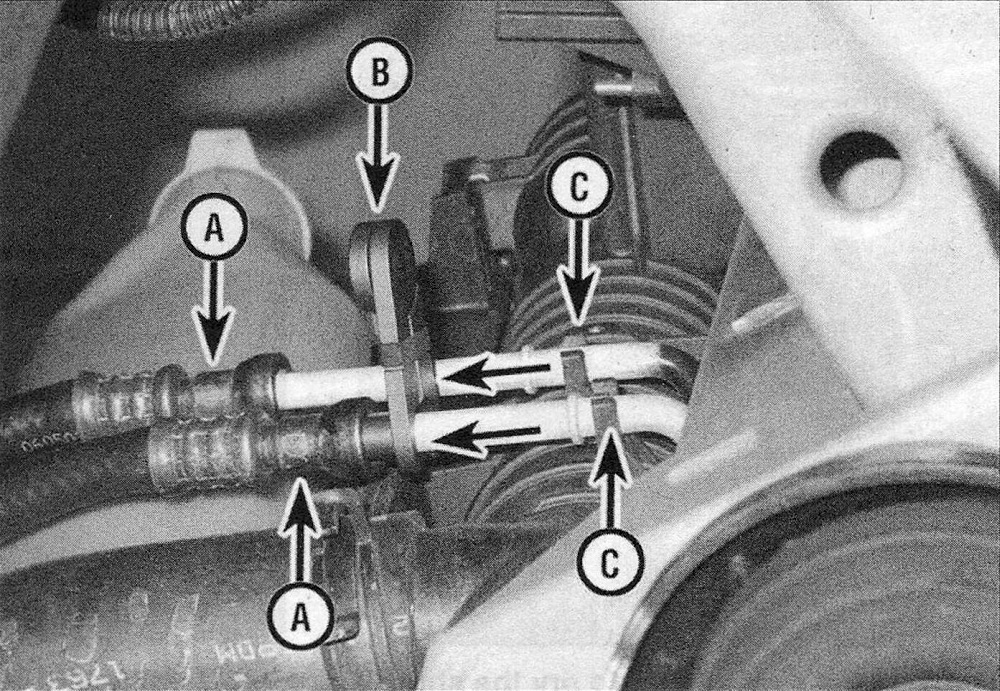
4. Using a quick-connect release tool (available at most auto parts stores), disconnect the transmission oil cooler line fittings (see illustration). Plug the lines to prevent fluid spills.
5.4 To disconnect each transmission oil cooler line fitting (A), insert the special quick-connect release tool (B) into each fitting, push the tool into the fitting until it releases the locking fingers inside the fitting, then pull the two sides of the fitting apart. Once both fittings are disconnected, detach both lines from the clips (C) on the radiator side tank (typical assembly shown)
5. Detach the transmission oil cooler lines from the radiator side tank.
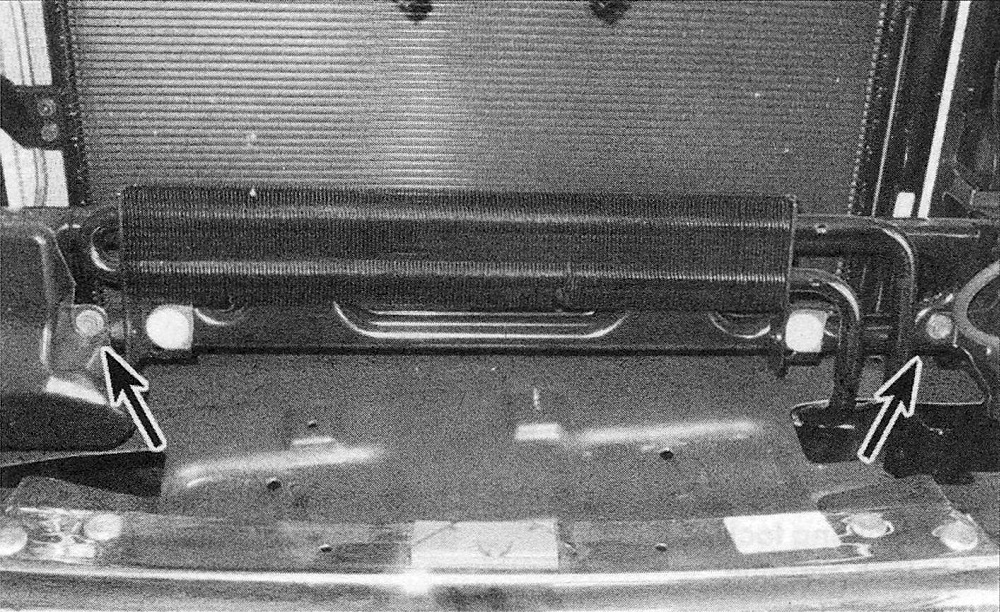
6. Remove the transmission oil cooler mounting bolts and/or nuts (see illustration) and remove the cooler. Be careful not to damage the oil cooler tubes or the radiator cooling fins.
5.6 Typical transmission oil cooler mounting bolt locations
7. On diesel models, remove the oil cooler thermostat (see Steps 11 through 13) from the cooler, clean it, inspect it, then install the old thermostat or a new one.
8. If you removed the cooler in order to flush it after a transmission failure, have it flushed by a dealer service department or by a transmission shop. A number of special tools are needed to flush the cooler correctly.
9. Installation is the reverse of removal. Check the transmission fluid level and add some if necessary (see Tune-up and routine maintenance).
Thermostat
Note: The air-to-oil coolers on diesel engines are equipped with a serviceable internal thermostat. The thermostat is located inside a housing at the upper left corner of the cooler, at the left end of the cooler bypass tube. Gasoline engines are not equipped with this thermostat.
10. Remove the transmission oil cooler (see Steps 1 through 6).
11. Remove the snap-ring that retains the thermostat end-plug.
12. Remove the end-plug, the thermostat and the spring from the thermostat housing.
13. Thoroughly clean out the thermostat bore in the housing and wash the end-plug, thermostat and spring in clean solvent. Inspect the parts for wear and damage. If anything is worn or damaged, replace it.
14. Installation is the reverse of removal.
Water-to-oil cooler
Warning: Wait until the engine is completely cool before beginning this procedure.
Note: Only diesel engines are equipped with this cooler.
15. Disconnect the cables from the negative battery terminals.
16. Remove the starter motor (see Engine electrical systems).
17. Drain the cooling system (see Tune-up and routine maintenance).
18. Disconnect the coolant lines from the oil cooler. Use a back-up wrench on the transmission cooler boss to protect the cooler.
19. Disconnect the transmission fluid lines from the oil cooler. Plug the cooler lines to prevent dirt and moisture from entering the lines.
20. Remove the cooler mounting bracket-totransmission adapter bolt.
21. On 2009 models, detach the wiring harness from the bottom of the coolant bracket.
22. On 2010 and later models, detach the ground cable from its stud, then remove the upper nut.
23. Remove the cooler assembly.
24. Installation is the reverse of removal. Check the transmission fluid level and add some if necessary (see Tune-up and routine maintenance).