Cylinder head – removal and installation
Warning: The engine must be completely cool before beginning this procedure.
Note: The following procedure describes how to remove the cylinder heads with the camshaft (s) and the exhaust manifold(s) still attached to the cylinder head.
Removal
1. Remove the intake manifold (Intake manifold – removal and installation).
2. Remove the timing chains, sprockets and the timing chain guides (Timing chain and sprockets – removal, inspection and installation).
3. Raise the front of the vehicle and support it securely on jackstands.
4. Unbolt the exhaust pipes from the exhaust manifolds.
5. Label and remove any remaining items attached to the cylinder head, such as coolant fittings, ground straps, cables, hoses, wires or brackets.
6. Using a breaker bar and the appropriate sized socket, loosen the cylinder head bolts in 1/4-turn increments until they can be removed by hand. Loosen the bolts in the reverse order of the tightening sequence (see illustration 11.19a or 11.19b) to avoid warping or cracking the head.
7. Lift the cylinder head off the engine block with the camshaft in place and the exhaust manifold attached. If it’s stuck, very carefully pry up at the front end of the cylinder head, beyond the gasket surface, at a casting protrusion.
8. Remove all external components from the head to allow for thorough cleaning and inspection.
Installation
9. The mating surfaces of the cylinder head and block must be perfectly clean when the head is installed.
10. Use a gasket scraper to remove all traces of carbon and old gasket material from the cylinder head and engine block being careful not to gouge the aluminum, then clean the mating surfaces with lacquer thinner or acetone. If there’s oil on the mating surfaces when the head is installed, the gasket may not seal correctly and leaks could develop. When working on the block, stuff the cylinders with clean shop rags to keep out debris. Use a vacuum cleaner to remove material that falls into the cylinders.
11. Check the block and head mating surfaces for nicks, deep scratches and other damage. If damage is slight, it can be removed with a file; if it’s excessive, machining may be the only alternative.
12. Use a tap of the correct size to chase the threads in the head bolt holes, then clean the holes with compressed air – make sure that nothing remains in the holes. Warning: Wear eye protection when using compressed air!
13. With a straight-edge, check each cylinder head bolt for stretching. If all threads do not contact the straight-edge, replace the bolt.
14. Check the cylinder head for warpage. Check the head gasket, intake and exhaust manifold surfaces. Consult with an automotive machine shop.
15. Install any components that were removed from the head such as the lash adjusters, the exhaust manifold and the camshaft back onto the cylinder head.
16. Position the new cylinder head gasket over the dowel pins on the block noting which direction on the gasket faces up.
17. Carefully set the head over the dowels on the block without disturbing the gasket.
18. Before installing the M10 head bolts, apply a small amount of clean engine oil to the threads and hardened washers (if equipped). The chamfered side of the washers must face the bolt heads. Before installing the M8 head bolts, apply a small amount of thread sealant to the bolt threads.
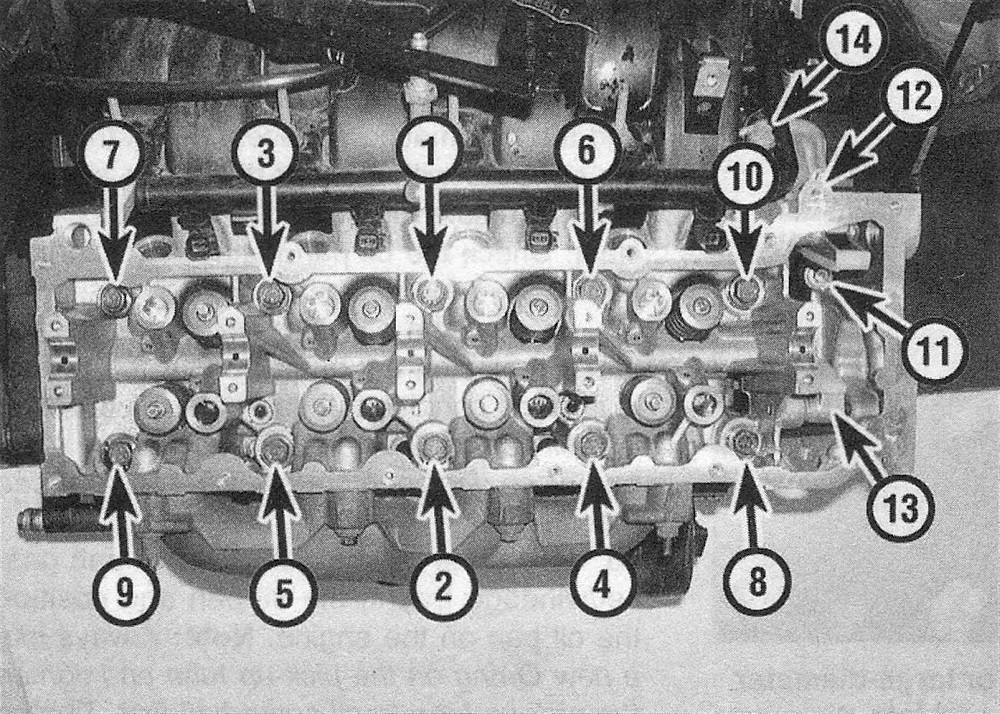
19. Install the bolts in their original locations and tighten them finger tight. Then tighten them, following the proper sequence, to the torque and angle of rotation listed in this Chapter’s Specifications (see illustrations).
11.19a Cylinder head bolt tightening sequence – 3.7L V6
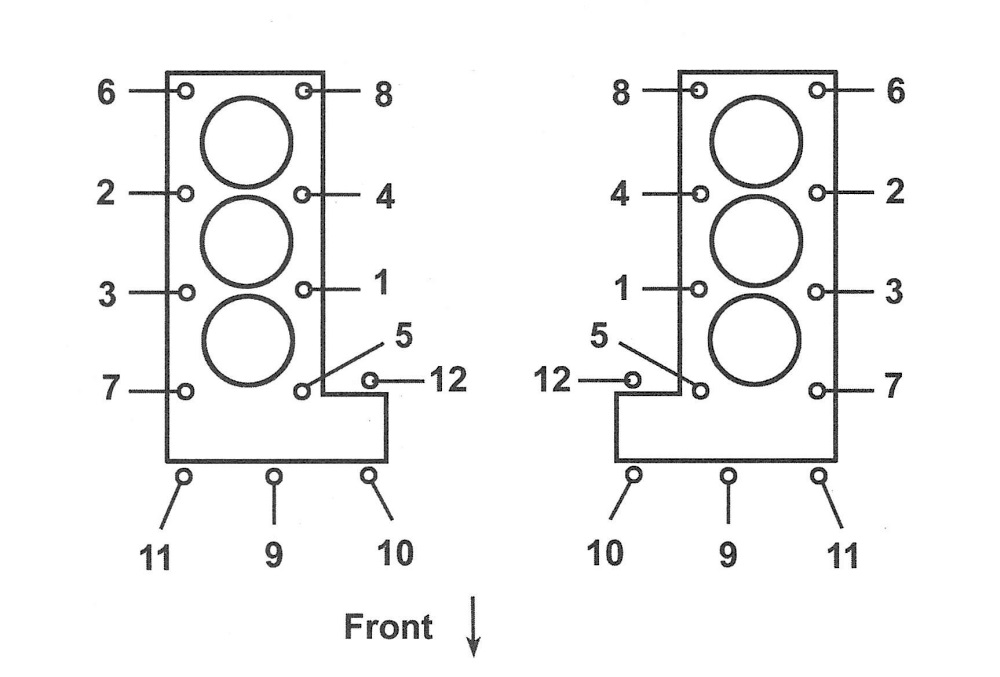
11.19b Cylinder head bolt tightening sequence – 4.7L V8
11.19c Using an angle measurement gauge during the final stages of tightening
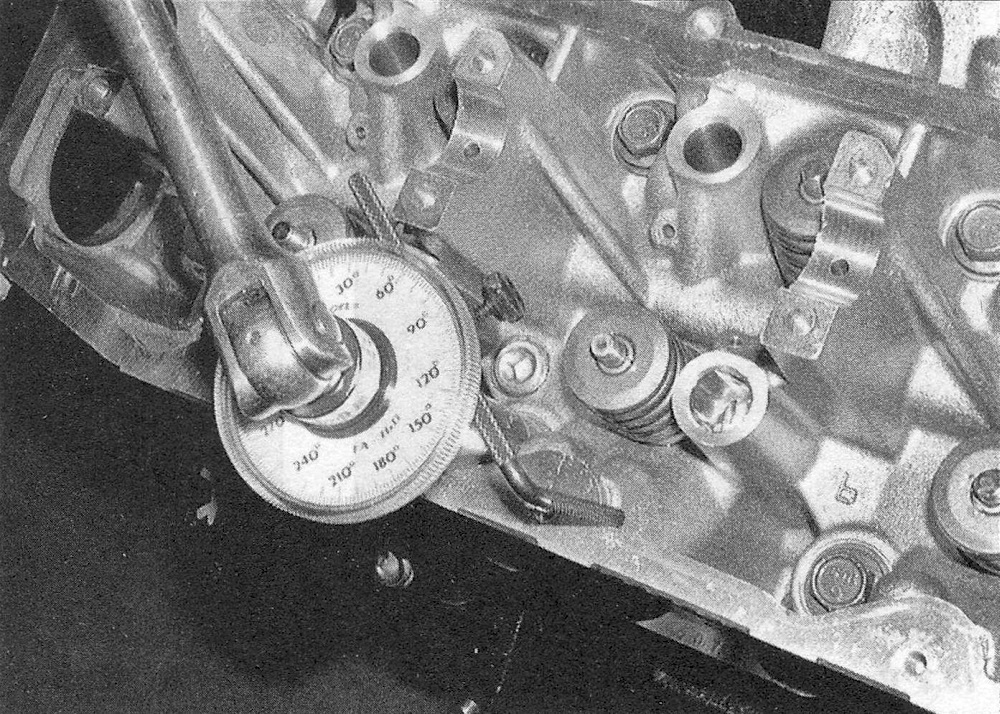
11.19a Cylinder head bolt tightening sequence – 3.7L V611.19b Cylinder head bolt tightening sequence – 4.7L V811.19c Using an angle measurement gauge during the final stages of tightening
20. Install the timing chain guides, the timing chains and the timing chain sprockets (Timing chain and sprockets – removal, inspection and installation). The remainder of installation is the reverse of removal.
21. Refill the cooling system and change the engine oil and filter (see Tune-up and routine maintenance).
22. Start the engine and check for oil and coolant leaks.